
+- Comfort Automation/ Security System Forums (https://www.comfortforums.com)
+-- Forum: Products (https://www.comfortforums.com/forum-3.html)
+--- Forum: UCMs (https://www.comfortforums.com/forum-146.html)
+---- Forum: UCMA/Pi (https://www.comfortforums.com/forum-162.html)
+---- Thread: UCMA/Pi – Complete Guide: Post 1 of 7 – Overview & Hardware (/thread-5857.html)
UCMA/Pi – Complete Guide: Post 1 of 7 – Overview & Hardware - slychiu - 05-16-2026
New UCXMA/Pi with Home Assistant App

UCMA/Pi — Home Assistant Add-on for Cytech Comfort
Complete setup and user guide — Version 3.0
Introduction
The UCMA/Pi is an add-on module for the Cytech Comfort Alarm/Automation system. It contains a Compute Module 4 (CM4) Raspberry Pi running Home Assistant OS (HAOS). Connecting the UCMA/Pi to your Comfort system gives you full integration with Home Assistant, allowing you to monitor and control your alarm from any web browser or smartphone — at home or remotely.
This guide covers initial setup, configuration of the Cytech Comfort add-on, loading your Comfort database, and using the Home Assistant interface on desktop and mobile.
1.1 Key Features
- Pre-installed with Home Assistant OS — no additional software required
- Cytech Comfort MQTT Bridge — connects Comfort to Home Assistant using MQTT
- Mosquitto MQTT Broker — built-in, pre-configured for local communication
- ComfortLink — instant secure remote access with no setup required
- Tailscale VPN — optional secure remote access via your own VPN account
- Home Assistant Companion App — full mobile access on Android and iOS
- Push notifications for alarm events: arm, disarm, and alerts
- Direct access to Comfort entities: zones, outputs, flags, counters, sensors, timers
1.2 Requirements
- Comfort alarm system with the UCMA/Pi module
- A network router with a spare Ethernet port
- A PC or smartphone on the same network
- The Comfort configuration file in CCLX format for your installation
2. Hardware Overview and Installation
2.1 What's in the Box
- UCMA/Pi module (PCB with Raspberry Pi CM4)
- UCM connection cable (white/grey, 4-pin connectors at each end)
- QR Code linking this manual
Note: The UCMA/Pi is powered entirely by the Comfort panel via the UCM bus. No external power supply or USB power is required during normal operation.
2.2 The UCMA/Pi Module
The UCMA/Pi is built around the Raspberry Pi Compute Module 4 (CM4), mounted on a carrier board designed to interface directly with the Cytech Comfort UCM bus.
2.3 Connectors and Ports
Ethernet Port (RJ45) — Located on the top-left edge of the board. Connect a standard Ethernet cable from this port to your network router or switch.
UCM RS485 Bus Connector — The white 4-pin connector connects to the Comfort RS485 bus via the supplied cable. This cable carries both data and power to run the module.
USB Port — One USB 2.0 port for external interfaces e.g. Zigbee, Z-Wave, Matter, or a keyboard. Not required for normal operation.
HDMI Port — For direct display output during maintenance. Not required for normal operation.
Terminal Blocks (Blue) — Screw terminals on the right side provide an alternative connection to Comfort (12V/GND/KA/KB) — same signals as the RS485 bus cable.
2.4 LED Indicators
- D4 (green) — 5 V power — lit continuously when the module is receiving power from the UCM bus
- D2 (red) — 3.3 V power — lit continuously when the on-board 3.3 V regulator is active
- D1 (green) — Activity — flashes during SD card / storage activity. Rapid flashing on first boot is normal
- Ethernet LEDs — On the RJ45 port. Green = link active; amber/flashing = data activity
Note: On first power-on, the D1 activity LED will flash continuously for several minutes while Home Assistant OS initialises. This is normal. Do not remove power during this process.
2.5 UCM ID Setting
Each UCM device on the Comfort bus must have a unique ID. The UCMA/Pi UCM ID is set by the SW7 DIP switch on the board. The factory default is ID 2. If ID 2 is taken by another UCM, set it to the next available sequential ID. Do not use ID 1, which is reserved for Comfigurator programming.
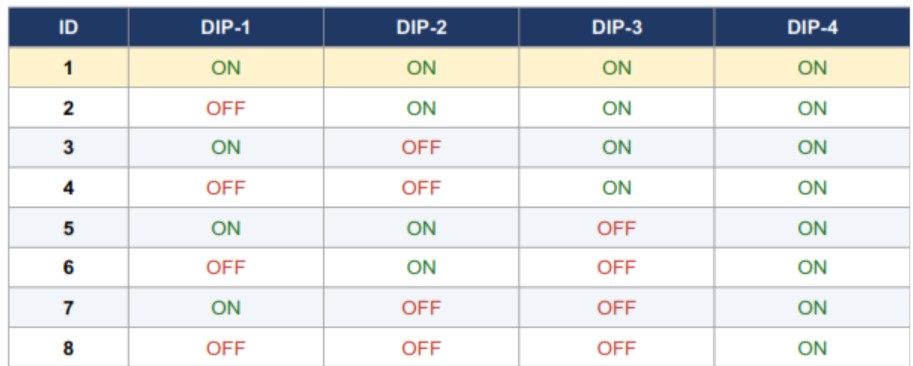
Important: Do not connect the UCMA/Pi to the Comfort bus if another device already has the same UCM ID. Duplicate IDs will cause communication errors on the entire bus.
2.6 The UCM Cable
The supplied cable connects the UCMA/Pi to the Comfort panel's UCM bus port. It has identical 4-pin connectors at each end and can be plugged in either way — the connectors are keyed to prevent incorrect insertion.
2.7 Installation Steps
- Power off the Comfort panel at the mains before handling the module.
- Set the UCM ID DIP switches to a unique, unused ID (default is 2). See Section 2.5.
- Mount the UCMA/Pi in the Comfort panel enclosure using the provided fixing points.
- Connect one end of the UCM cable to the JP2 or JP2A 4-pin connector on the UCMA/Pi board.
- Connect the other end of the cable to the RS485 4-pin connector on the Comfort board.
- Connect an Ethernet cable from the RJ45 port on the UCMA/Pi to your network router or switch.
- Insert the pre-programmed micro SD card into the slot until it clicks into place.
- Restore power to the Comfort panel. The UCMA/Pi will start automatically. Allow up to 5 minutes on first boot for Home Assistant OS to initialise.
Troubleshooting Tip: After powering on, confirm the UCMA/Pi has started by checking your router's connected-device list for a new device named "cytech".
Guide Contents
- Post 1: Overview & Hardware (this post)
- Post 2: First-Time Setup
- Post 3: Add-ons & Configuring the Cytech Comfort Add-on
- Post 4: Loading the Comfort CCLX File
- Post 5: Comfort Alarm Dashboard, Entities & System Info
- Post 6: Mobile App Setup & Remote Access
- Post 7: Configuration Files, Troubleshooting & Quick Reference
Post 2 of 7 – First-Time Setup - slychiu - 05-16-2026
Post 2 of 7 — First-Time Setup
Running the Home Assistant onboarding wizard for the first time
When you power on the UCMA/Pi for the first time and open it in a browser, Home Assistant runs a one-time onboarding wizard. This section walks you through each step.
3.1 Accessing Home Assistant
Connect the UCMA/Pi to your router via Ethernet, then open a web browser on any device on the same network and navigate to:
Code:
http://cytech.local:8123If this address does not resolve, find the module's IP address in your router's device list and use:
Code:
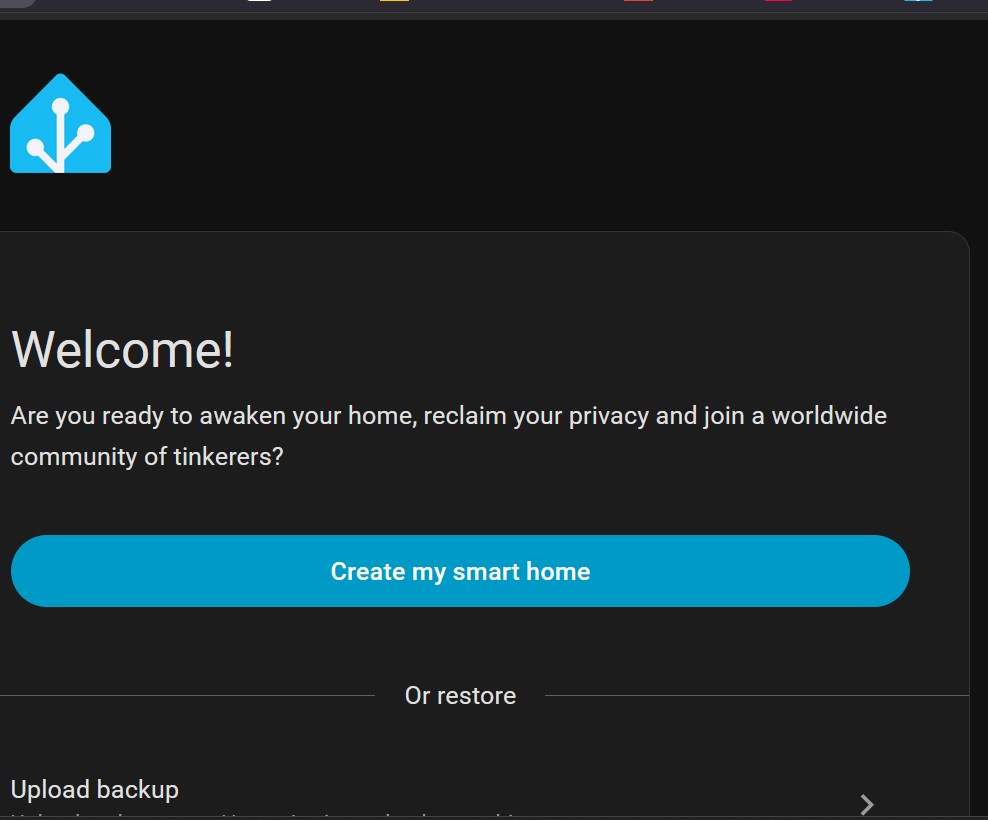
http://<IP address>:8123The Home Assistant welcome screen appears.
3.2 Creating a User Account
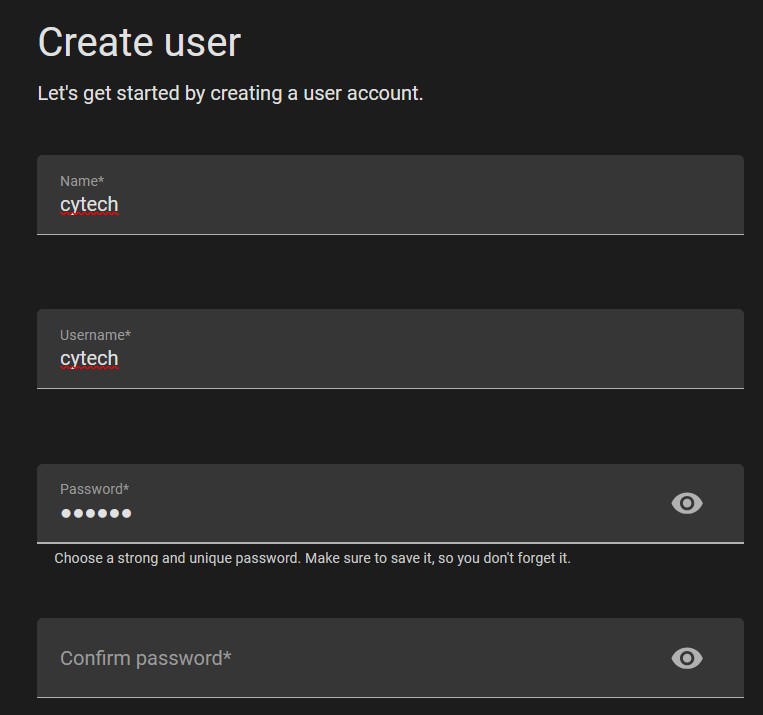
Click "Create my smart home". You will be asked to create an administrator account. Enter a display name, username, and a strong password, then click "Create account". Choose a password that is difficult to guess.
Note: Record your credentials carefully — there is no password-recovery option without direct access to the module.
3.3 Home Location
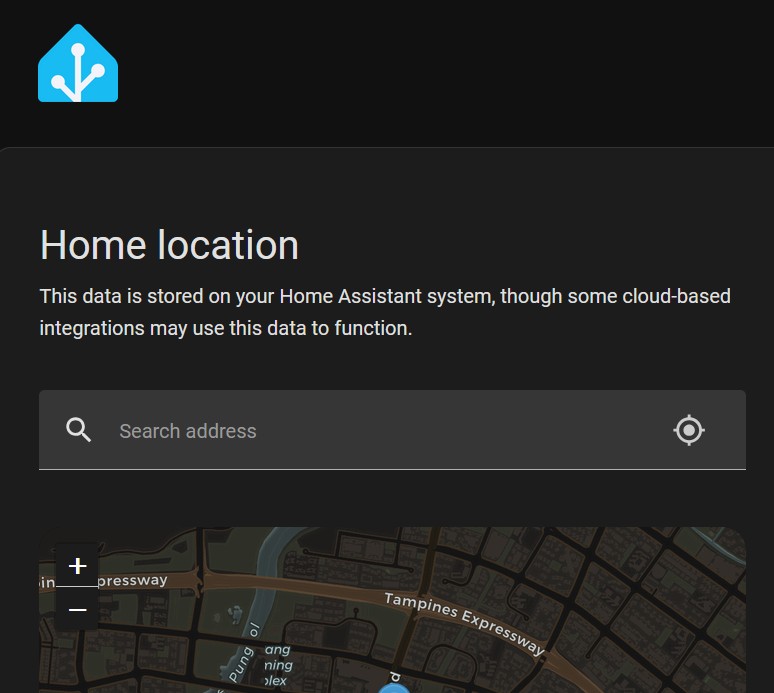
Home Assistant requests your home address or coordinates. This data is stored locally and used for time-based automations (sunrise/sunset) and the map view. It is not shared externally unless you enable cloud integrations. Allow Home Assistant to detect your location, or drag the pin to your location. Click "Next" when done.
3.4 Analytics Settings
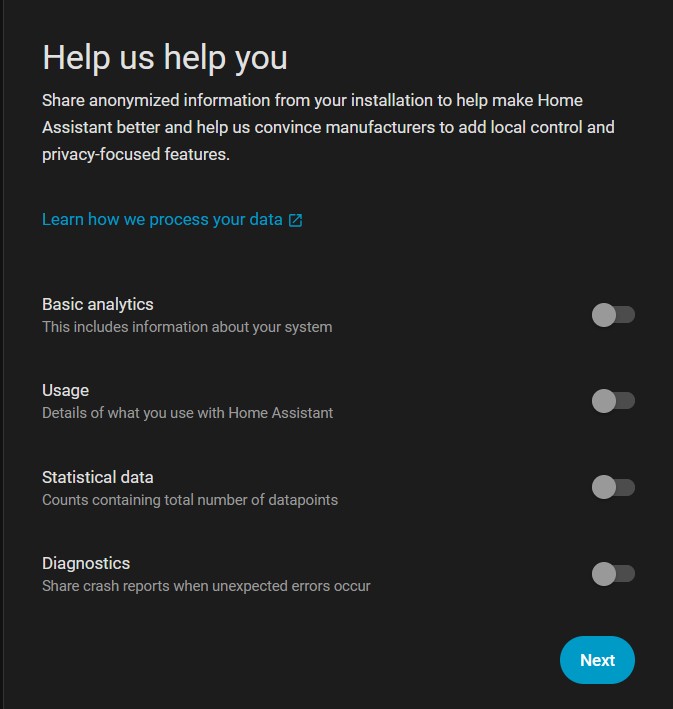
Home Assistant offers to send anonymous usage statistics to its developers. All options are disabled by default. You can leave them off and click "Next" to continue.
3.5 Detected Integrations
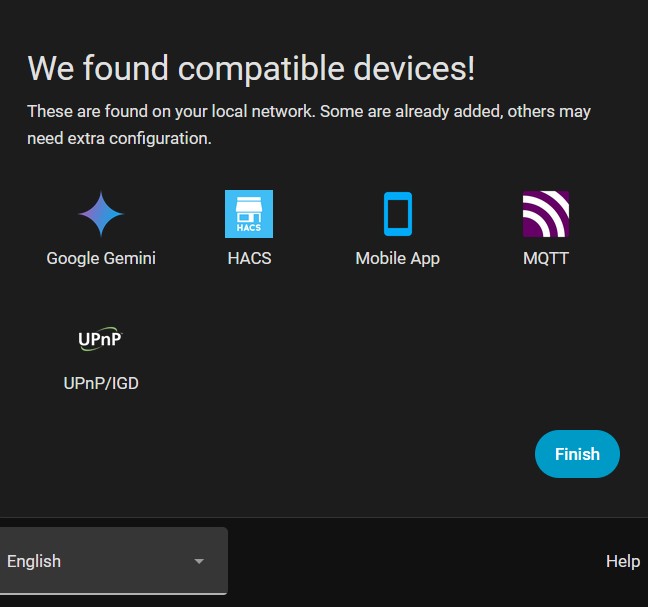
Home Assistant scans your network for compatible devices and services. It may detect items such as HACS, the Mobile App integration, MQTT, and UPnP/IGD. Click "Finish" to complete the wizard.
Note: You do not need to act on detected devices at this stage. The Cytech Comfort integration is configured separately in Post 3.
3.6 Home Assistant Dashboard
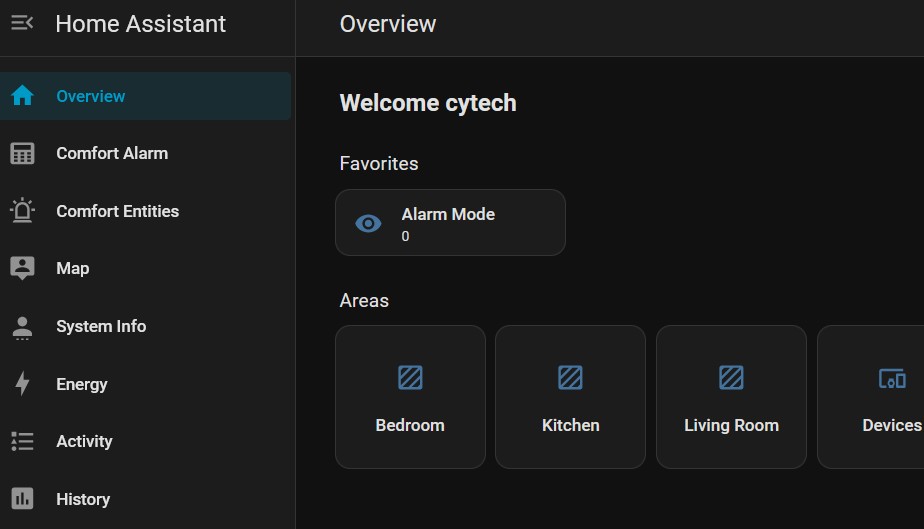
After the wizard, you arrive at the main dashboard (Overview). The left sidebar provides navigation to all pages. The Cytech Comfort pages — Comfort Alarm and Comfort Entities — appear in the sidebar once the Comfort add-on is configured.
3.7 Adding More Users
Additional users can be created so that family members or colleagues can log in with their own credentials. Standard (non-administrator) users can view dashboards and control devices but cannot modify system configuration.
To add a new user:
- In the left sidebar, click Settings.
- Select People, then click Add Person at the bottom.
- Enter the person's display name and click Create.
- On the person's profile page, scroll down to Allow Login and toggle it on.
- Enter a username and a strong password. Leave the Administrator toggle off for standard users.
- Click Update to save.
Logging in as the New User
The new user opens a browser and goes to the Home Assistant address (e.g. http://cytech.local:8123) and enters their username and password.
Changing a Password
Any user can change their own password by clicking their username at the bottom of the left sidebar, then selecting Security.
Removing a User
An admin can go to Settings → People, click the person's name, scroll to the bottom, and click Delete.
Setting Up the Mobile App for a New User — See Post 6.
Post 3 of 7 – Add-ons & Configuring the Cytech Comfort Add-on - slychiu - 05-16-2026
Post 3 of 7 — Add-ons & Configuring the Cytech Comfort Add-on
Reviewing pre-installed add-ons and setting up the Comfort connection
4. Add-ons
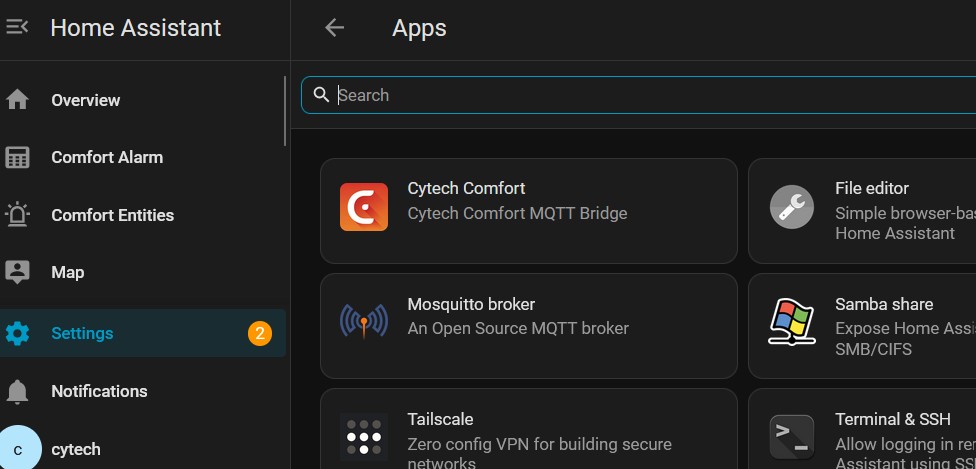
Add-ons are applications that run inside Home Assistant and extend its capabilities. The UCMA/Pi comes with several add-ons pre-installed. To view them, go to Settings → Add-ons in the sidebar.
4.1 Pre-installed Add-ons
- Cytech Comfort — The Cytech Comfort MQTT Bridge. Core add-on connecting Comfort to Home Assistant. Must always be running.
- Mosquitto Broker — Open-source MQTT message broker. Handles all communication. Do not change any settings here.
- Tailscale — Zero-configuration VPN for secure remote access. See Post 6. Do not change any settings here.
- Terminal & SSH — Command-line access to the module. For advanced users only.
- Samba Share — Exposes the HA configuration folder as a Windows network share. For advanced users only.
- File Editor — Browser-based text editor for HA configuration files. For advanced users only.
5. Configuring the Cytech Comfort Add-on
The Cytech Comfort add-on is pre-configured with the correct MQTT and Comfort settings. To open it, go to Settings → Add-ons, then click Cytech Comfort.
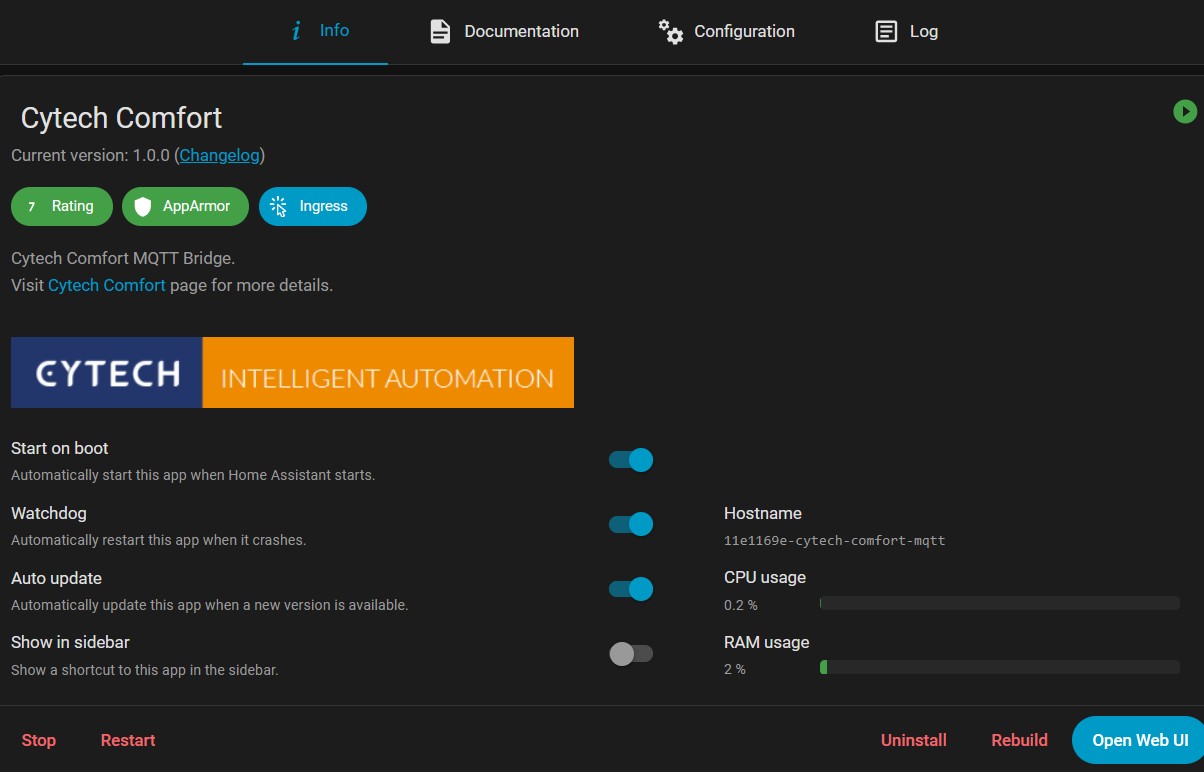
5.1 Info Page
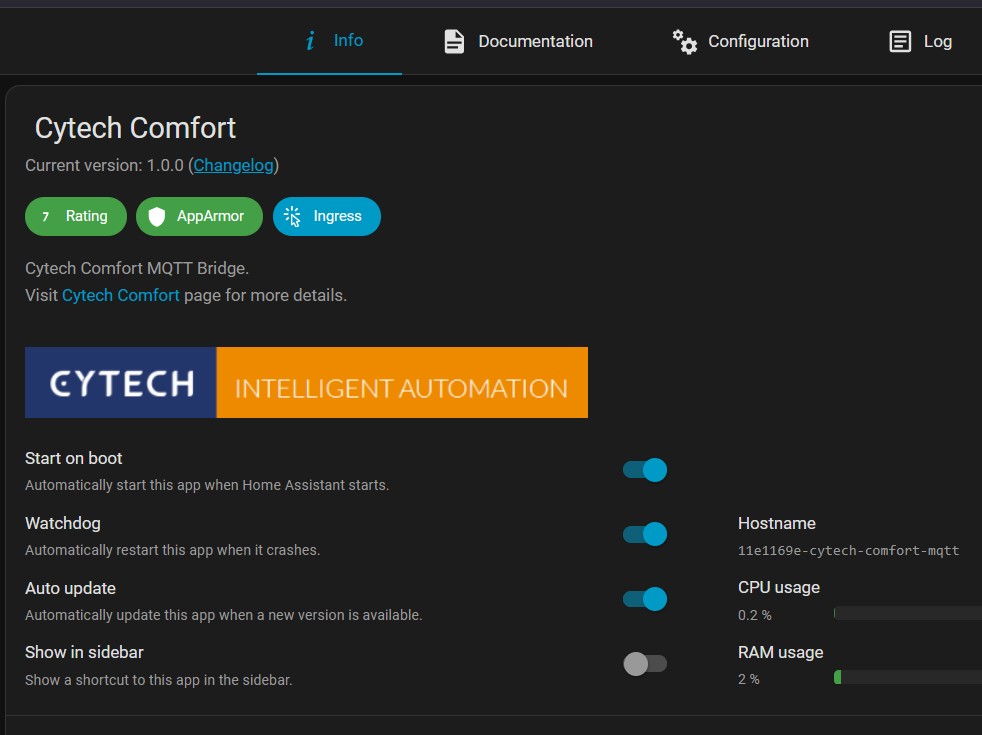
The Info page shows the current version, CPU and RAM usage, and the following controls:
- Start on boot — Enabled. The add-on starts automatically when Home Assistant restarts.
- Watchdog — Enabled. Home Assistant restarts the add-on if it crashes.
- Auto update — Enabled. The add-on updates itself when a new version is released.
- Show in sidebar — Disabled.
5.2 Configuration — MQTT Settings
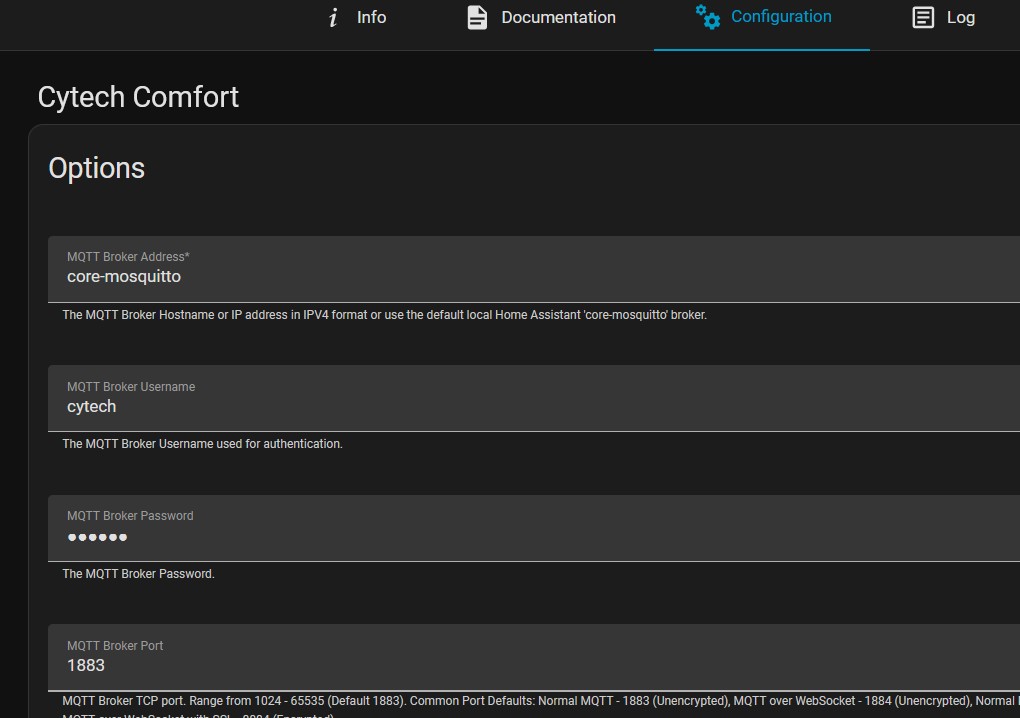
Click the Configuration tab. These settings can be left at their defaults.
- MQTT Broker Address — Leave as "core-mosquitto" (default). Only change if using a separate external MQTT broker.
- MQTT Broker Username — Leave as the default value (ComfortHA). Do not change — it must match the pre-configured Mosquitto credentials.
- MQTT Broker Password — Leave as the default value (ComfortHA). Do not change.
- MQTT Broker Port — 1883 for standard TCP (default).
- MQTT Transport Protocol — TCP (default).
5.3 Configuration — Comfort System Settings
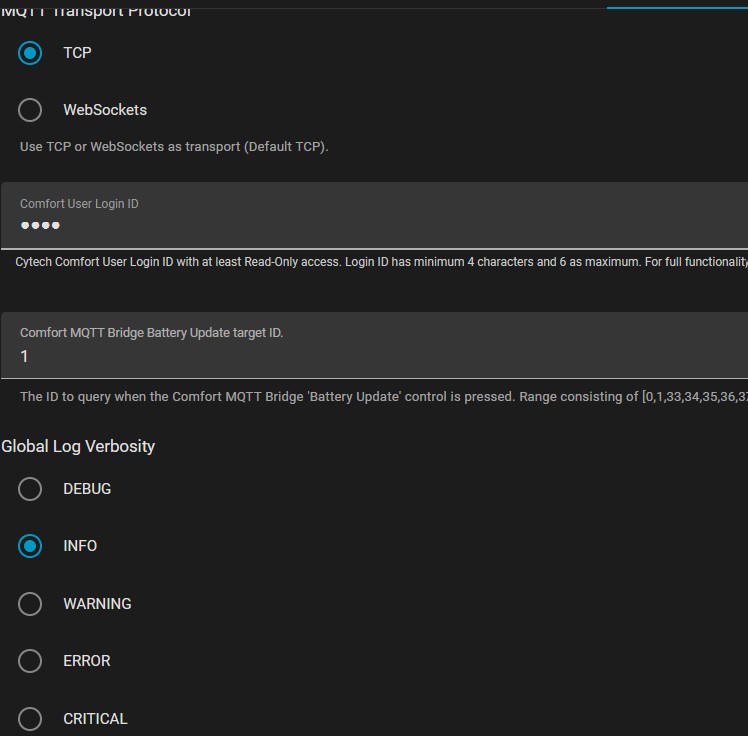
Scroll down for the Comfort-specific settings:
- Comfort User Login ID — The Comfort user code the bridge uses to log in to the panel. Default is 1234 (Comfort User 1). The user must have at least Read-Only access; for arming, disarming, and output control, a user with full access is required. User codes are 4–6 digits.
- Battery Update Target ID — Device ID to query when Battery Update is pressed. Default: 1.
- Global Log Verbosity — Use WARNING for normal operation; switch to DEBUG only when troubleshooting.
- Enable Comfigurator Maintenance Mode — When enabled, allows Comfigurator to connect to Comfort via the Web UI bridge mode (see Post 4, Section 6.5).
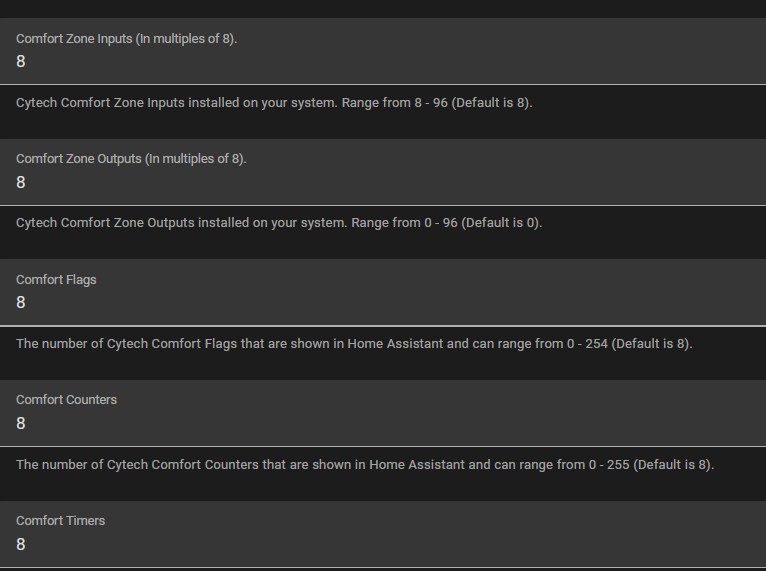
Further down the Configuration page, set the number of each entity type to expose in Home Assistant. Match these to your Comfort system. Setting values too high wastes memory; too low will hide entities.
- Zone Inputs — In multiples of 8. Range: 8–96. Default: 8.
- Zone Outputs — In multiples of 8. Range: 0–96. Default: 0.
- Comfort Flags — Range: 0–254. Default: 8.
- Comfort Counters — Range: 0–254. Default: 8.
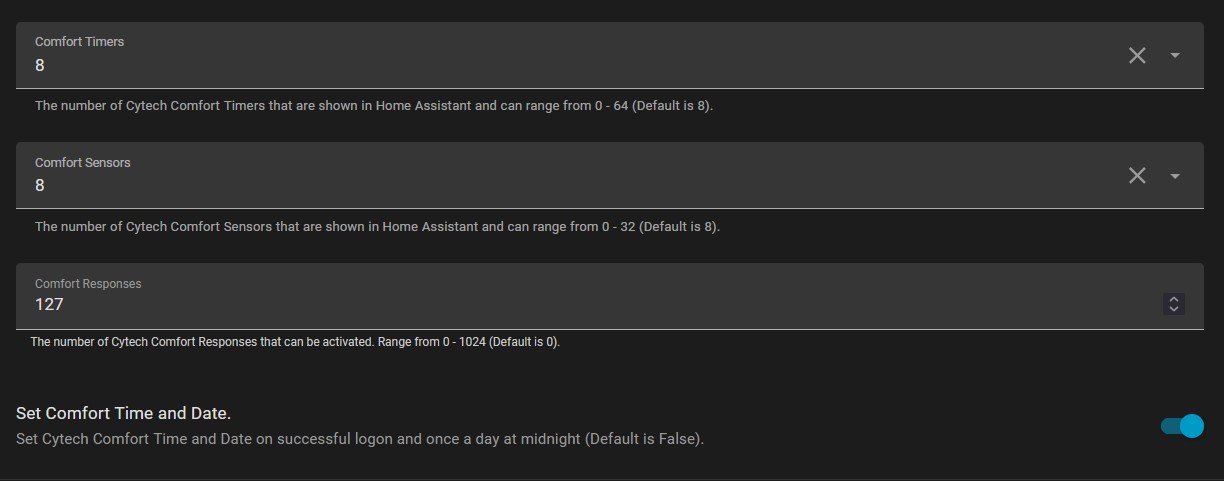
- Comfort Timers — Range: 0–64. Default: 8.
- Comfort Sensors — Range: 0–31. Default: 8.
- Comfort Responses — Range: 0–1024. Default: 0 (not currently used).
- Set Comfort Time and Date — When enabled, sets time/date on the Comfort panel at logon and once daily at midnight.
If any setting has been changed, click Save. Return to the Info tab and click Start (or Restart if already running).
Post 4 of 7 – Loading the Comfort CCLX File - slychiu - 05-16-2026
Post 4 of 7 — Loading the Comfort CCLX File
Uploading your Comfort configuration database to enable zone names and entity discovery
The Cytech Comfort add-on needs your Comfort system's configuration database in CCLX format. This file contains the names of zones, users, outputs, and other site-specific settings. Without it, entities appear with generic names such as Zone01, Zone02, etc.
6.1 Exporting the CCLX File
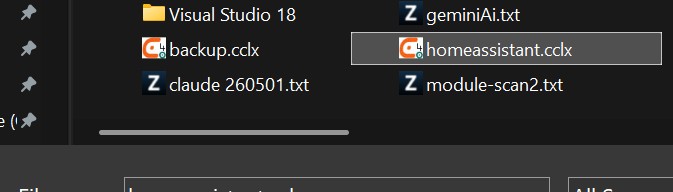
The Comfort configuration file should be saved on your PC as a .cclx file. The file pre-loaded to the Cytech add-on is homeassistant.cclx.
6.2 Accessing the Web UI
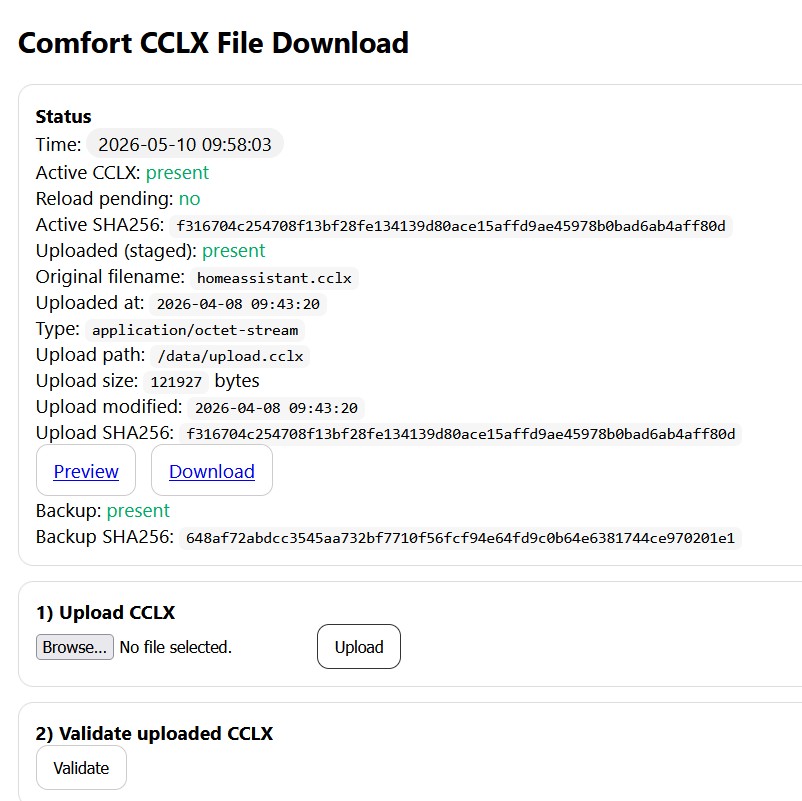
On the Cytech Comfort add-on Info page, click the "Open Web UI" button at the bottom right. This opens the CCLX management page in a new browser tab.
6.3 Uploading the CCLX File
The Web UI shows the status of the currently active CCLX file, including its SHA256 checksum and upload date.
- Under "Upload CCLX", click Browse and select your CCLX file.
- Click Upload. The file is transferred to the module.
6.4 Validating and Applying
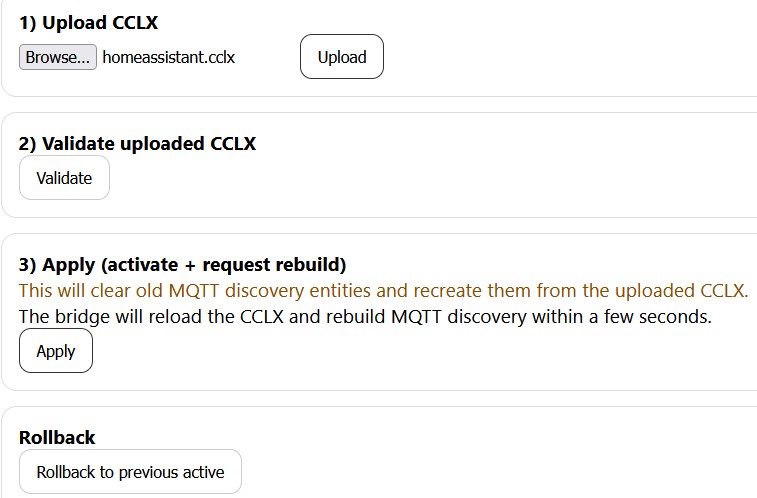
- Click Validate. This checks the uploaded file for errors. Wait for the result before proceeding.
- Click Apply. This activates the CCLX file and rebuilds the MQTT entity discovery. Existing entities will be cleared and recreated — this is expected.
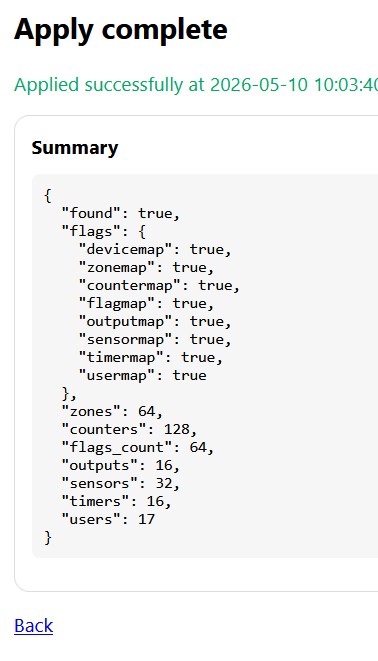
When complete, the page shows "Apply complete" with a summary of all entities found: zones, outputs, flags, counters, sensors, timers, and users. Home Assistant now uses the zone and entity names from your Comfort configuration.
A Rollback button is available if you need to revert to the previous CCLX.
Note: Any time you update your Comfort system configuration (add zones, rename outputs, etc.), re-export a new CCLX file and repeat steps 1–3 above.
6.5 Comfigurator Bridge Mode
At the top of the Web UI, you can select Comfigurator Bridge Mode or Normal MQTT Mode.
Bridge Mode allows the UCMA/Pi to act as a UCM with Ethernet, connecting Comfigurator to Comfort using the Home Assistant IP address at port 10001.
To use Comfigurator Bridge Mode:
- Enable Comfigurator Maintenance Mode in the add-on Configuration page (see Post 3, Section 5.3).
- Select Comfigurator Bridge Mode in the Web UI.
Important: When Comfigurator Bridge Mode is on, MQTT will not run. The Comfort Alarm, Comfort Entities, and System Info pages will show as "Unavailable" until Normal MQTT Mode is restored.
Post 5 of 7 – Comfort Alarm Dashboard, Entities & System Info - slychiu - 05-16-2026
Post 5 of 7 — Comfort Alarm Dashboard, Comfort Entities & System Info
Using the alarm control panel, entity management, and hardware status pages
7. Comfort Alarm Dashboard
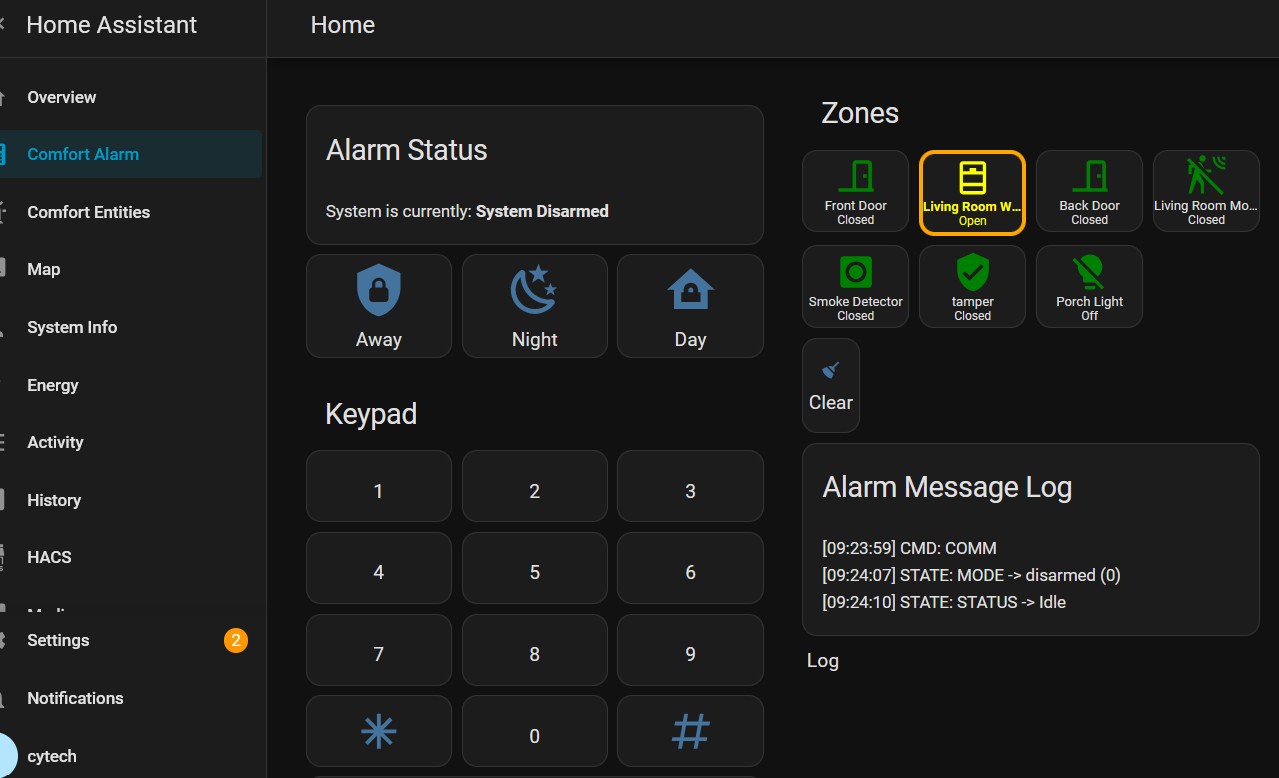
The Comfort Alarm page is the main control panel for your alarm system. It provides arm/disarm buttons, a virtual keypad, zone status, and a live alarm message log. Access it from "Comfort Alarm" in the left sidebar.
7.1 Desktop View
Alarm Status
The Alarm Status panel shows the current system state:
- System Disarmed — alarm is off; all zones inactive
- System Armed (Away) — fully armed; all zones active
- System Armed (Night) — night arm; typically perimeter zones only
- System Armed (Day/Home) — partial arm for when occupants are inside
- System Unavailable — bridge is not connected to the Comfort panel
Arming and Disarming
Use the Away, Night, or Day buttons to arm in the desired mode. To disarm, enter your user code on the keypad and press # to confirm. Press * to cancel or clear a partial entry.
Tip: The on-screen keypad works exactly like a physical Comfort keypad — you can arm, disarm, and send any code the same way.
Zone Status
The Zones panel shows all configured zones and their current state:
- Green icon — zone is secure (contact closed)
- Yellow/orange highlighted border — zone is open or not ready

If a zone is open when you attempt to arm, the Comfort system reports the zone name in the Comfort Message area and logs it in the Alarm Message Log.
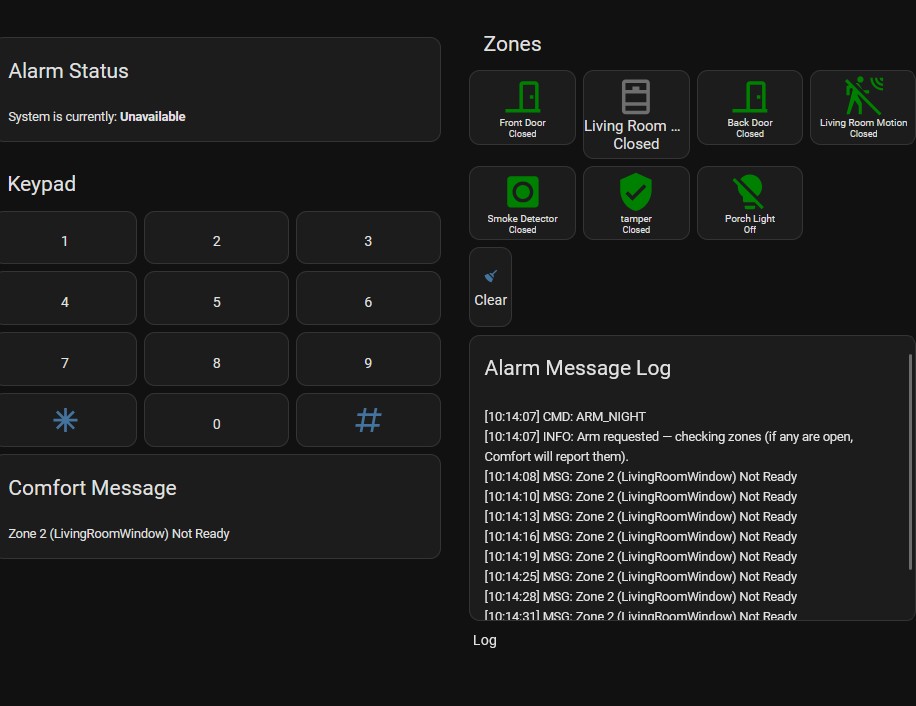
Armed Night Mode
When armed, the Alarm Status shows the current arm mode (Away, Night, or Day). Open zones that have been bypassed are indicated visually.
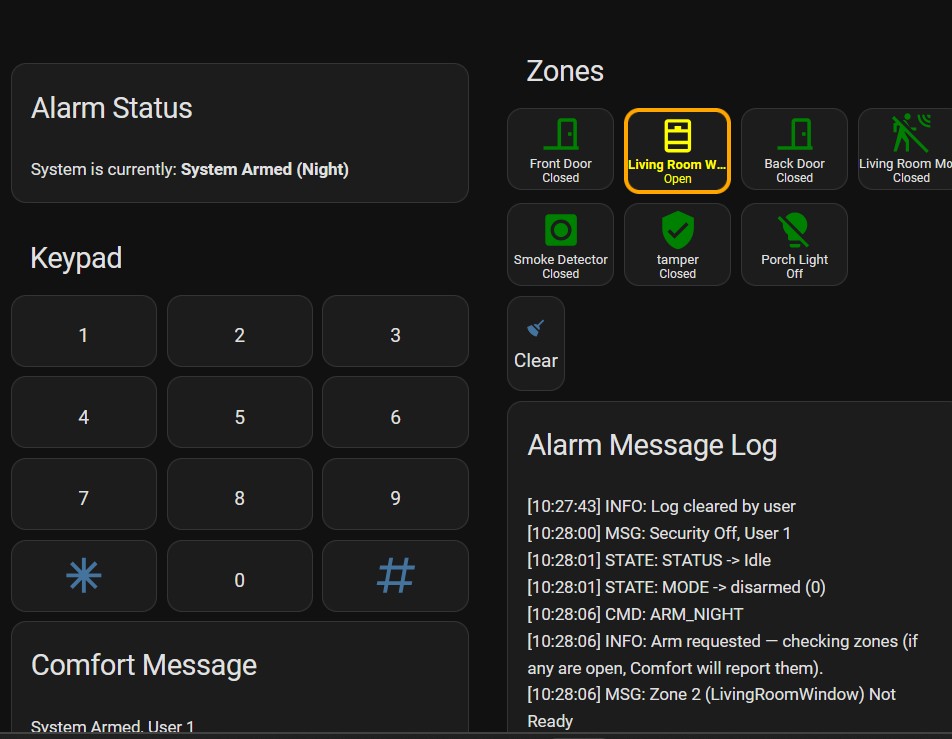
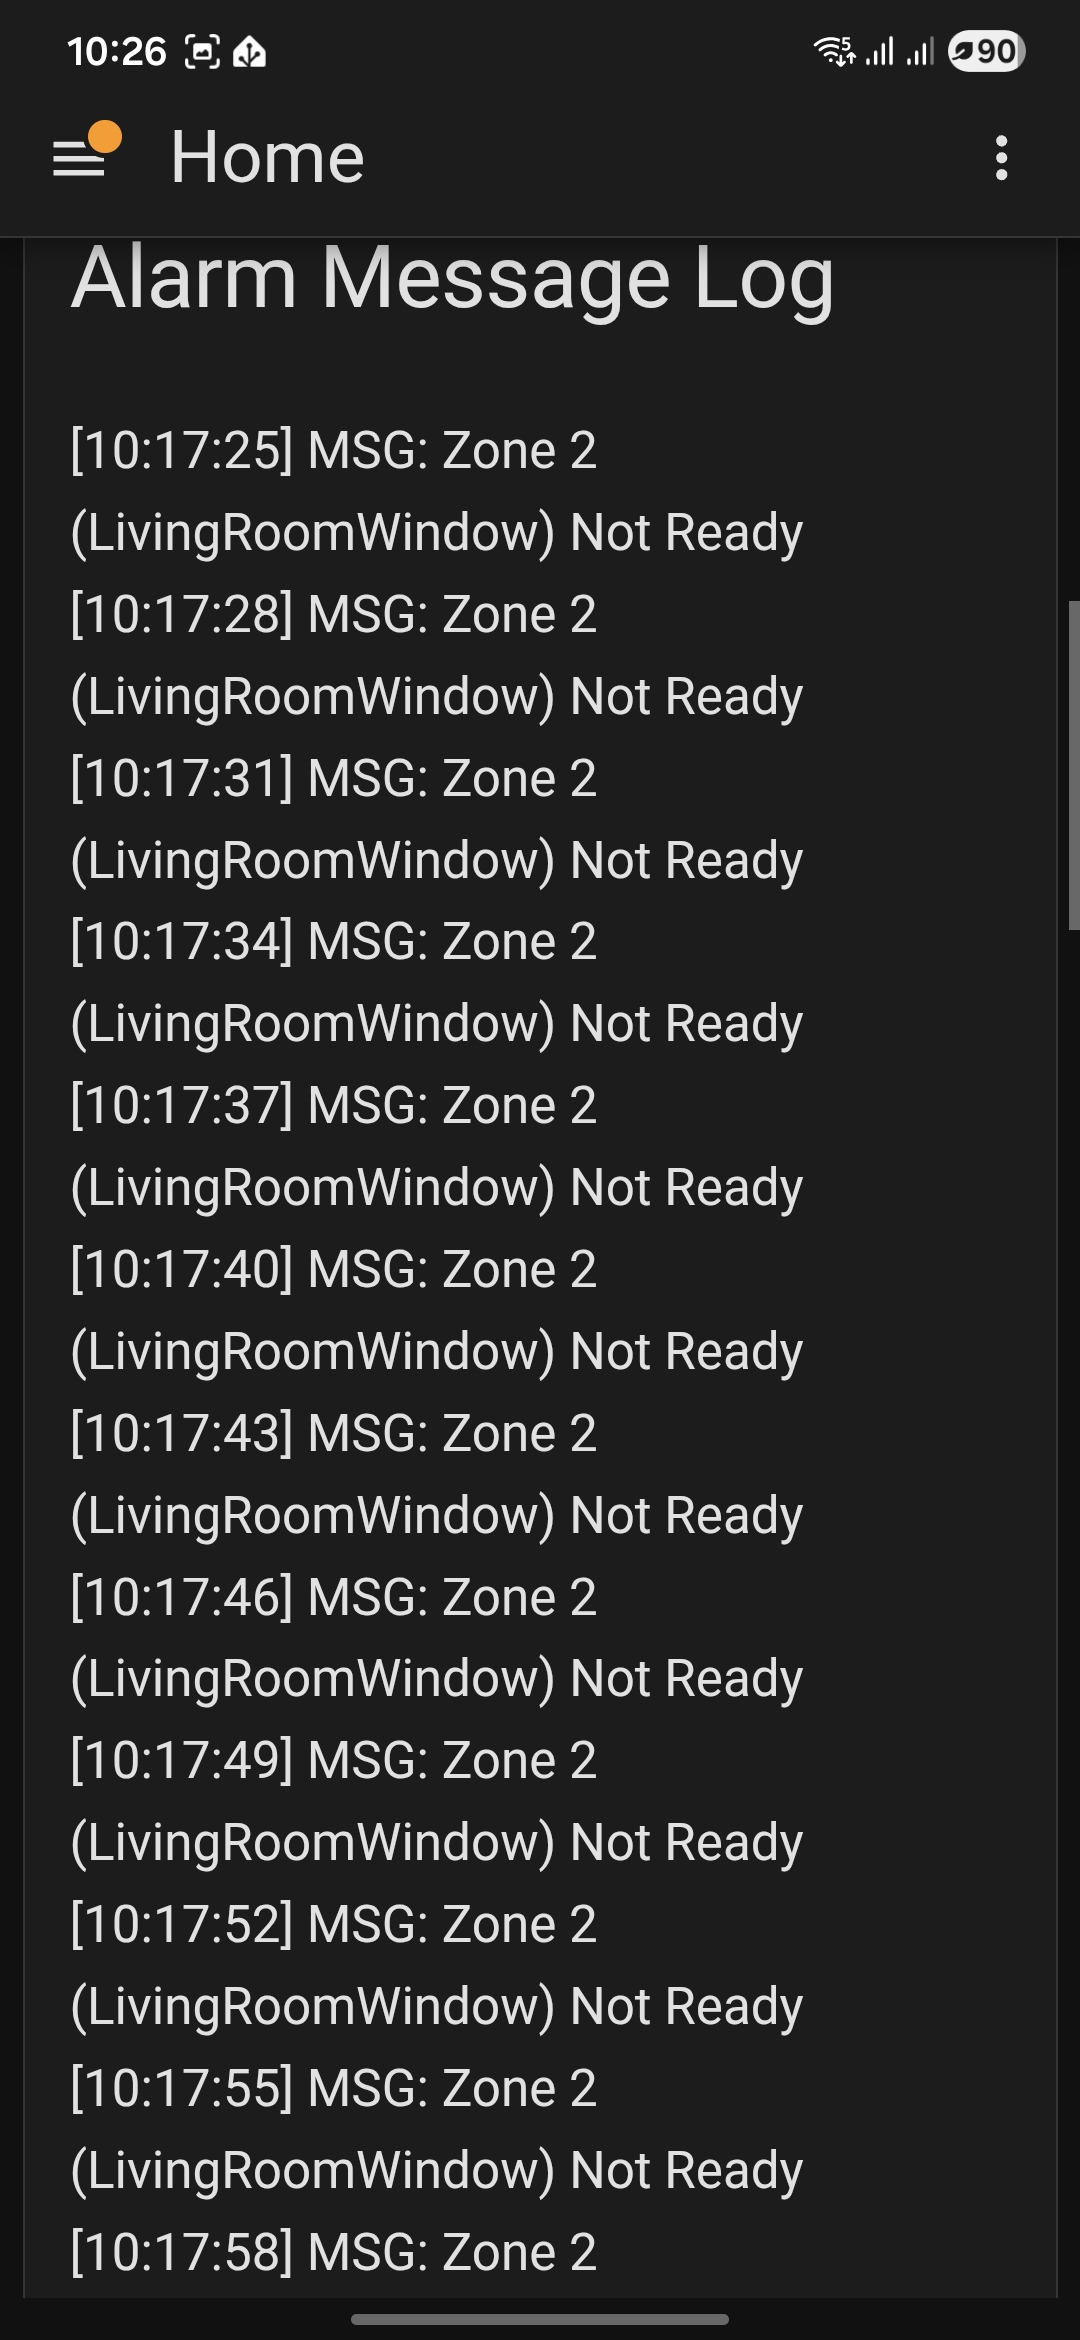
Alarm Message Log
Records all system events in real time with timestamps — mode changes, zone messages, arm/disarm actions, and alert conditions. The Clear button clears the display only; it does not erase the Comfort panel log.
Keypad

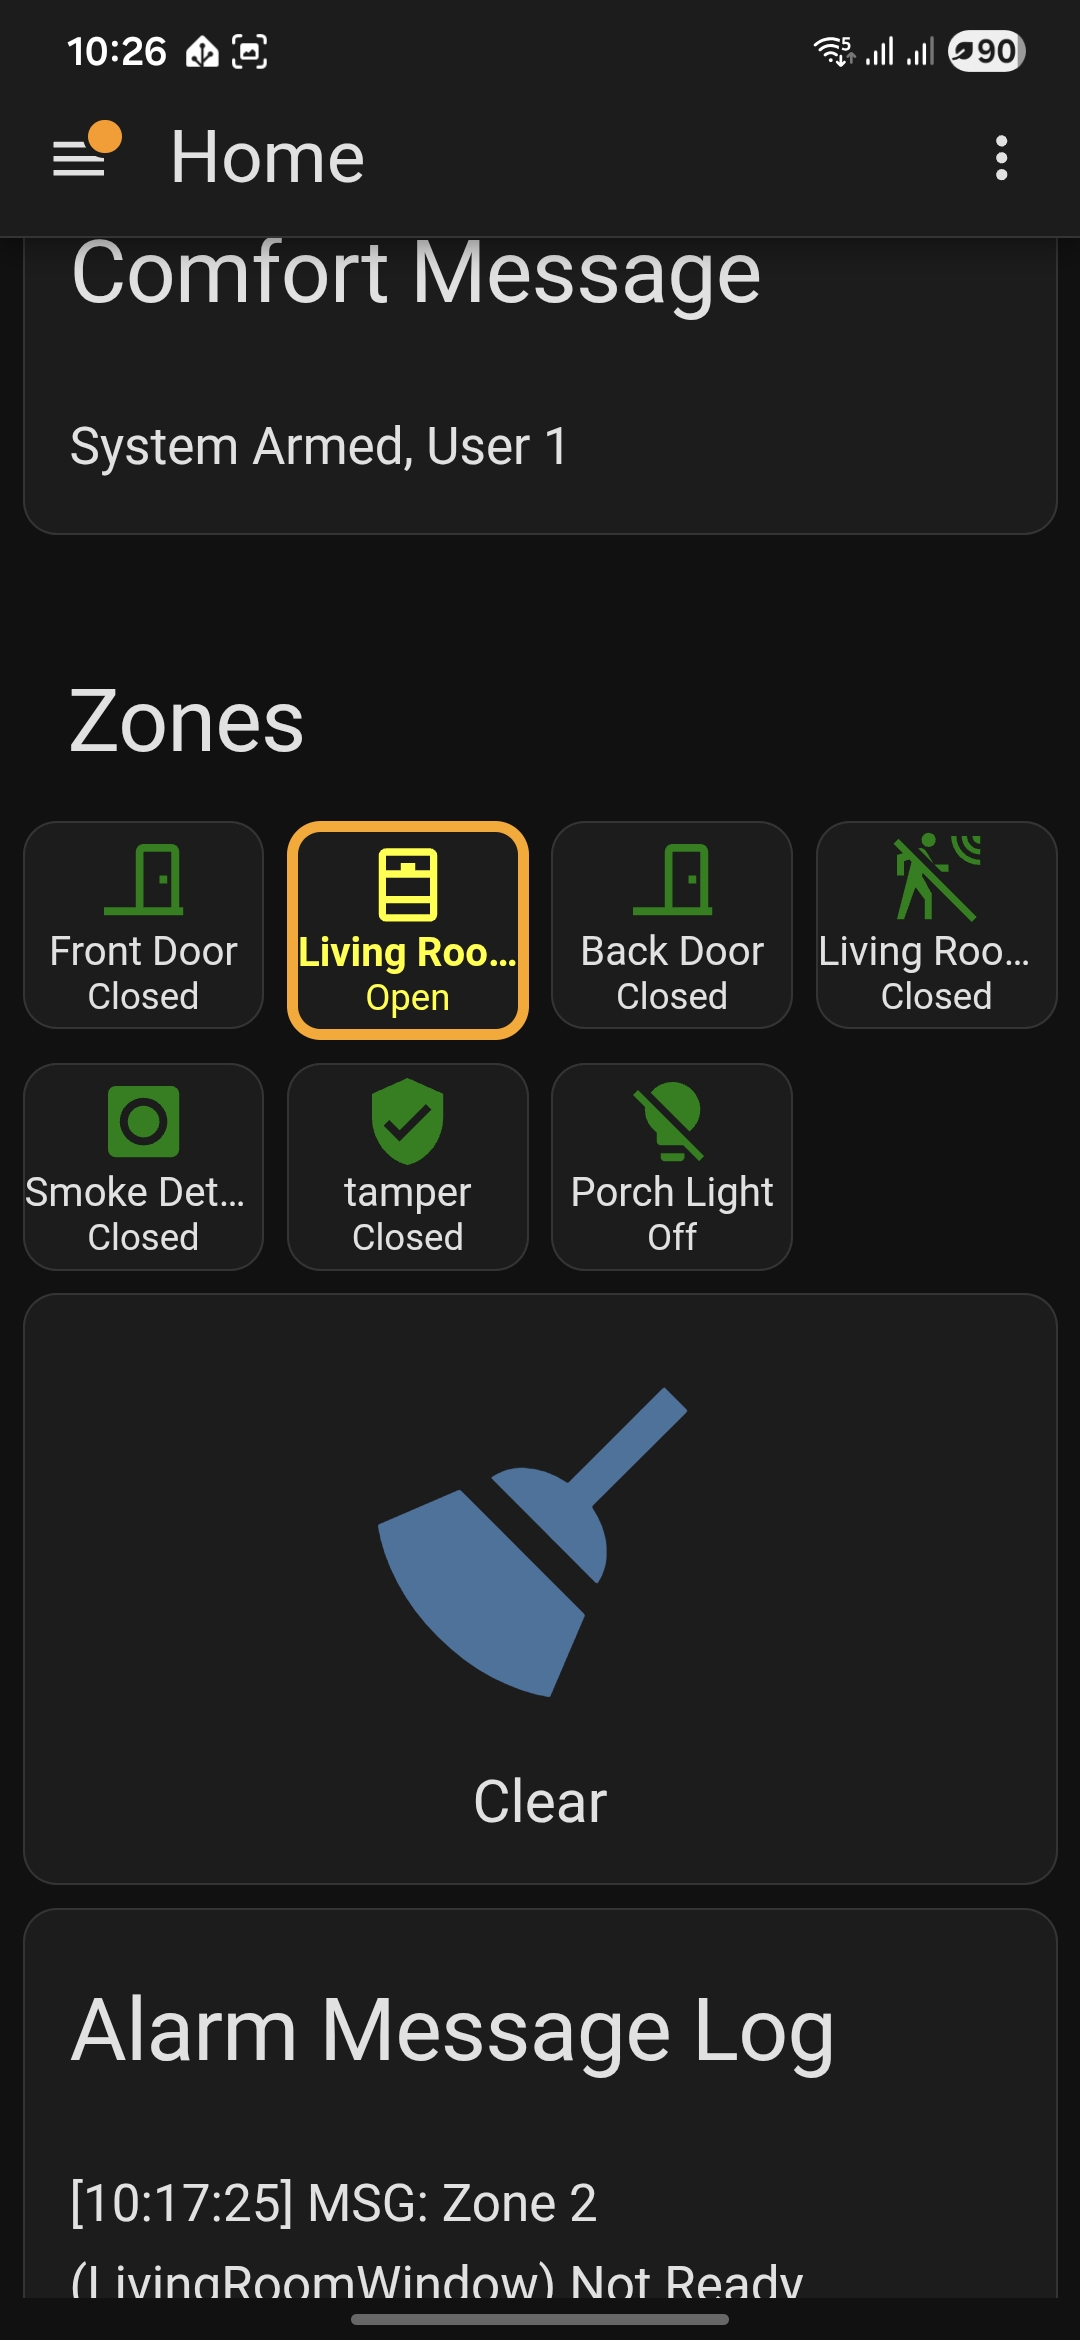
7.2 Mobile View
The Comfort Alarm page works identically on the mobile app. The layout adapts to the phone's screen with the arm buttons, alarm status, keypad, zones, and message log arranged vertically.

8. Comfort Entities
The Comfort Entities page gives you direct access to all Comfort data beyond alarm control: Zones, Outputs, Counters, Flags, Timers, and Sensors. Writable entities can be changed directly from this page.

8.1 Zones and Outputs
The Zones section mirrors zone status from the Comfort Alarm page. Each tile shows the zone name and current state (Open / Closed).
The Outputs section shows the state of all Comfort output channels. Outputs can be switched on or off by tapping their tiles, subject to the user access level configured in the add-on.
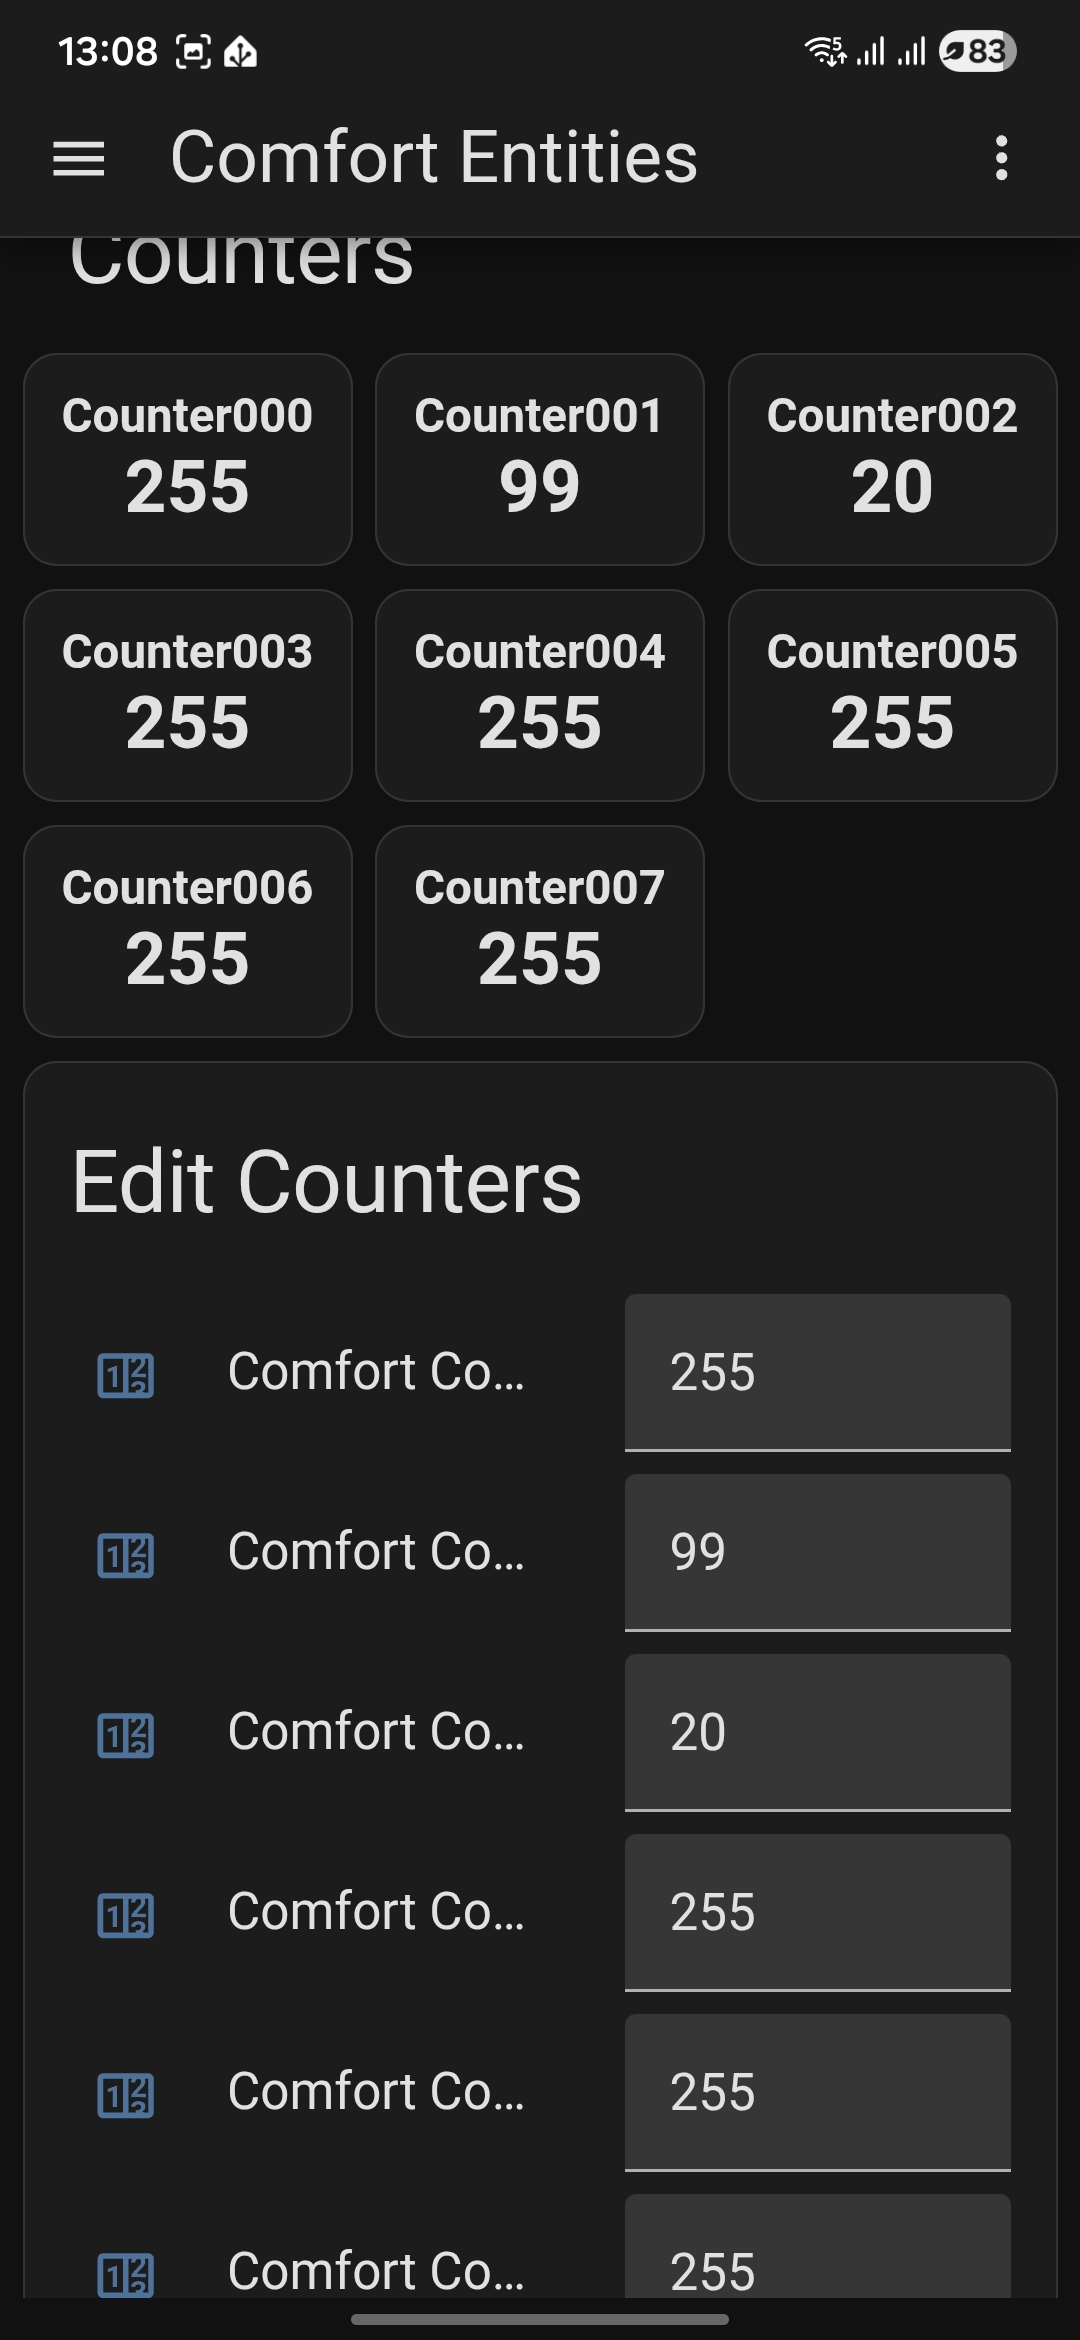
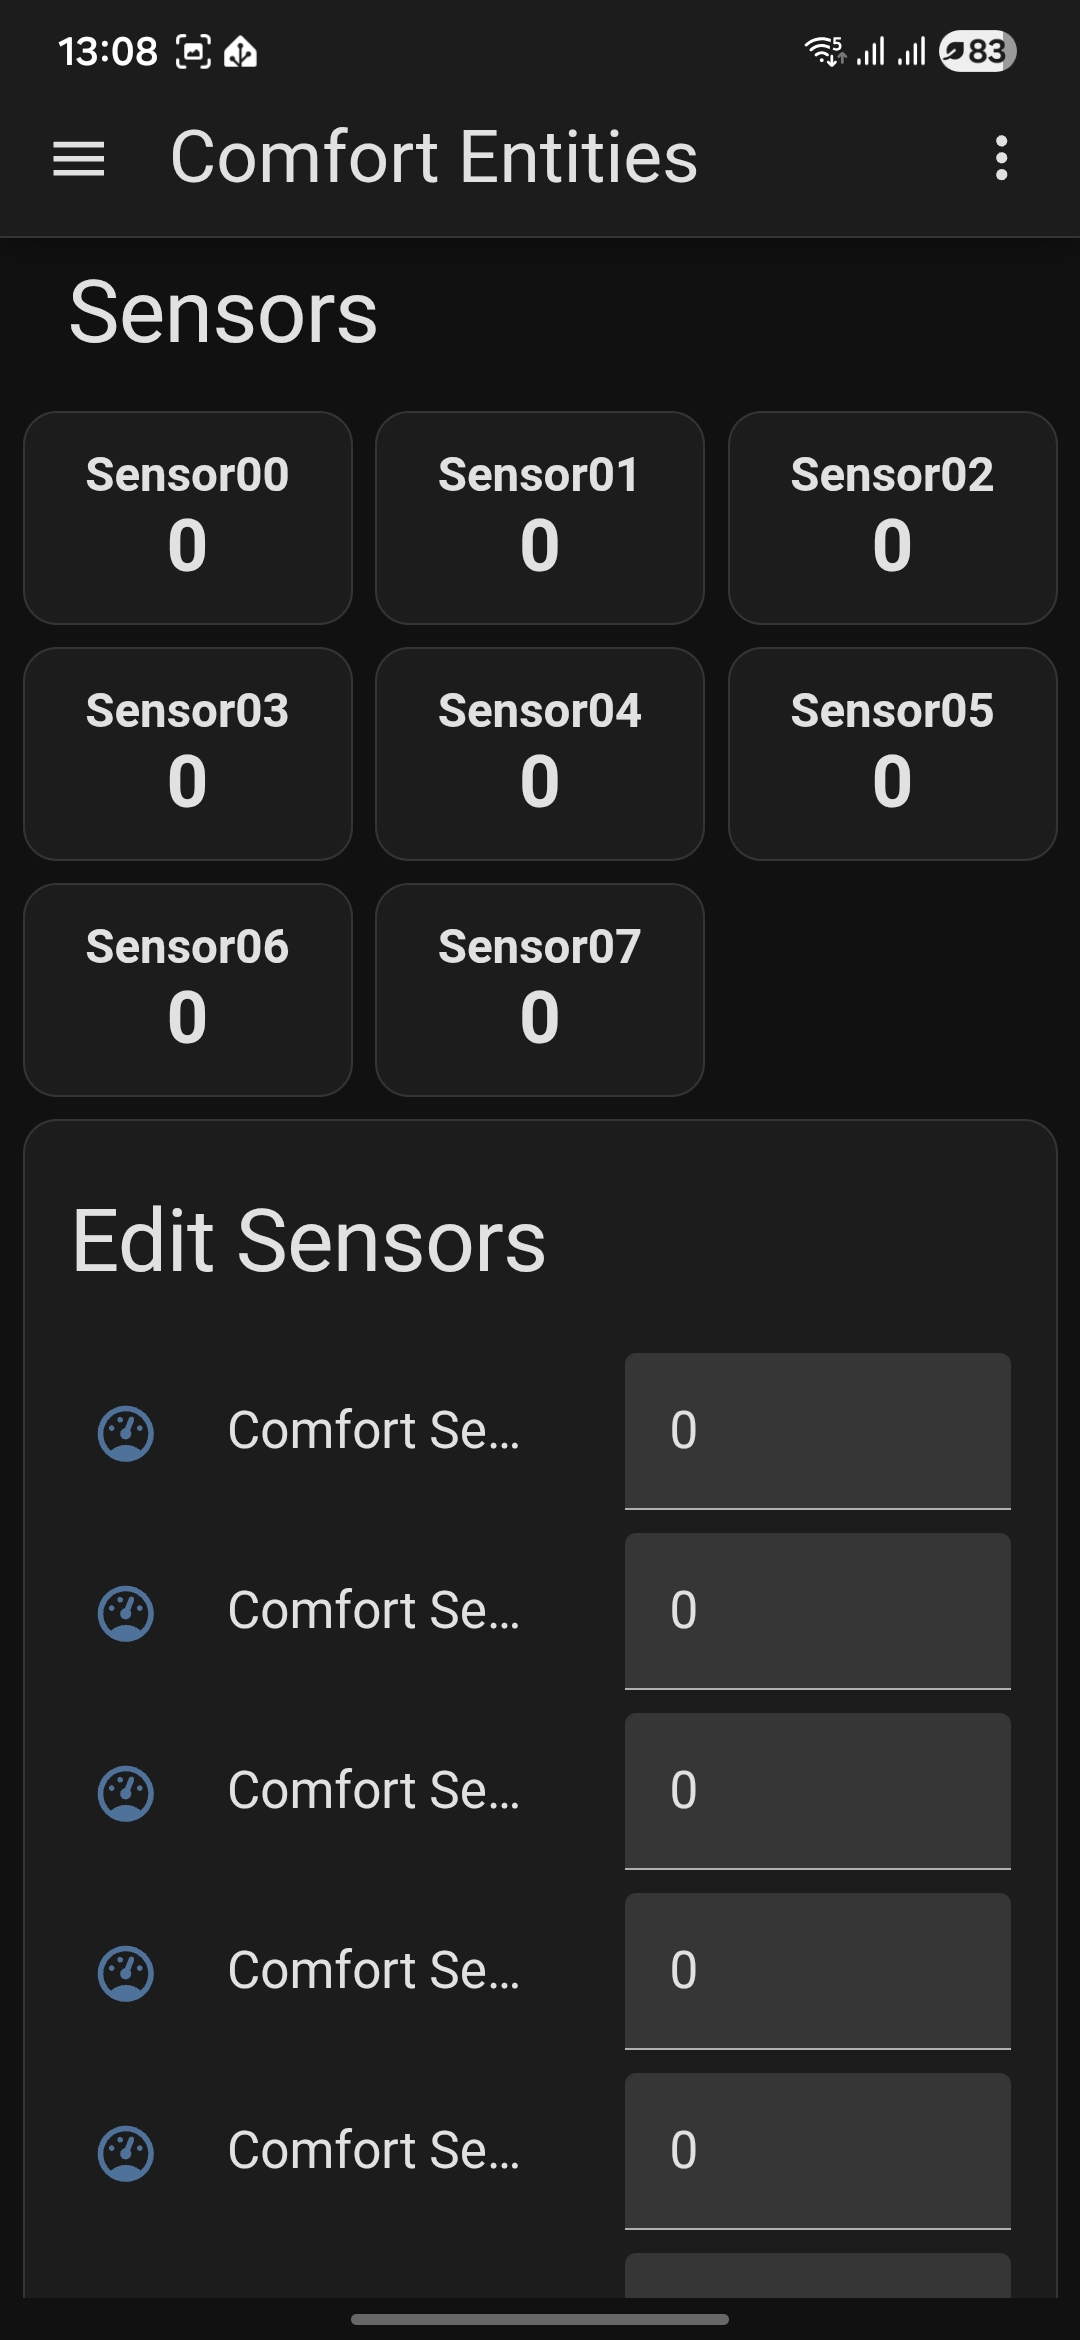
8.2 Counters, Flags and Sensors
Counters — Integer values (0–255) used in Comfort programming. The "Edit Counters" panel lets you enter and send new values directly.
Flags — Binary (On/Off) variables used in Comfort programming logic. Each flag tile can be toggled by tapping it.
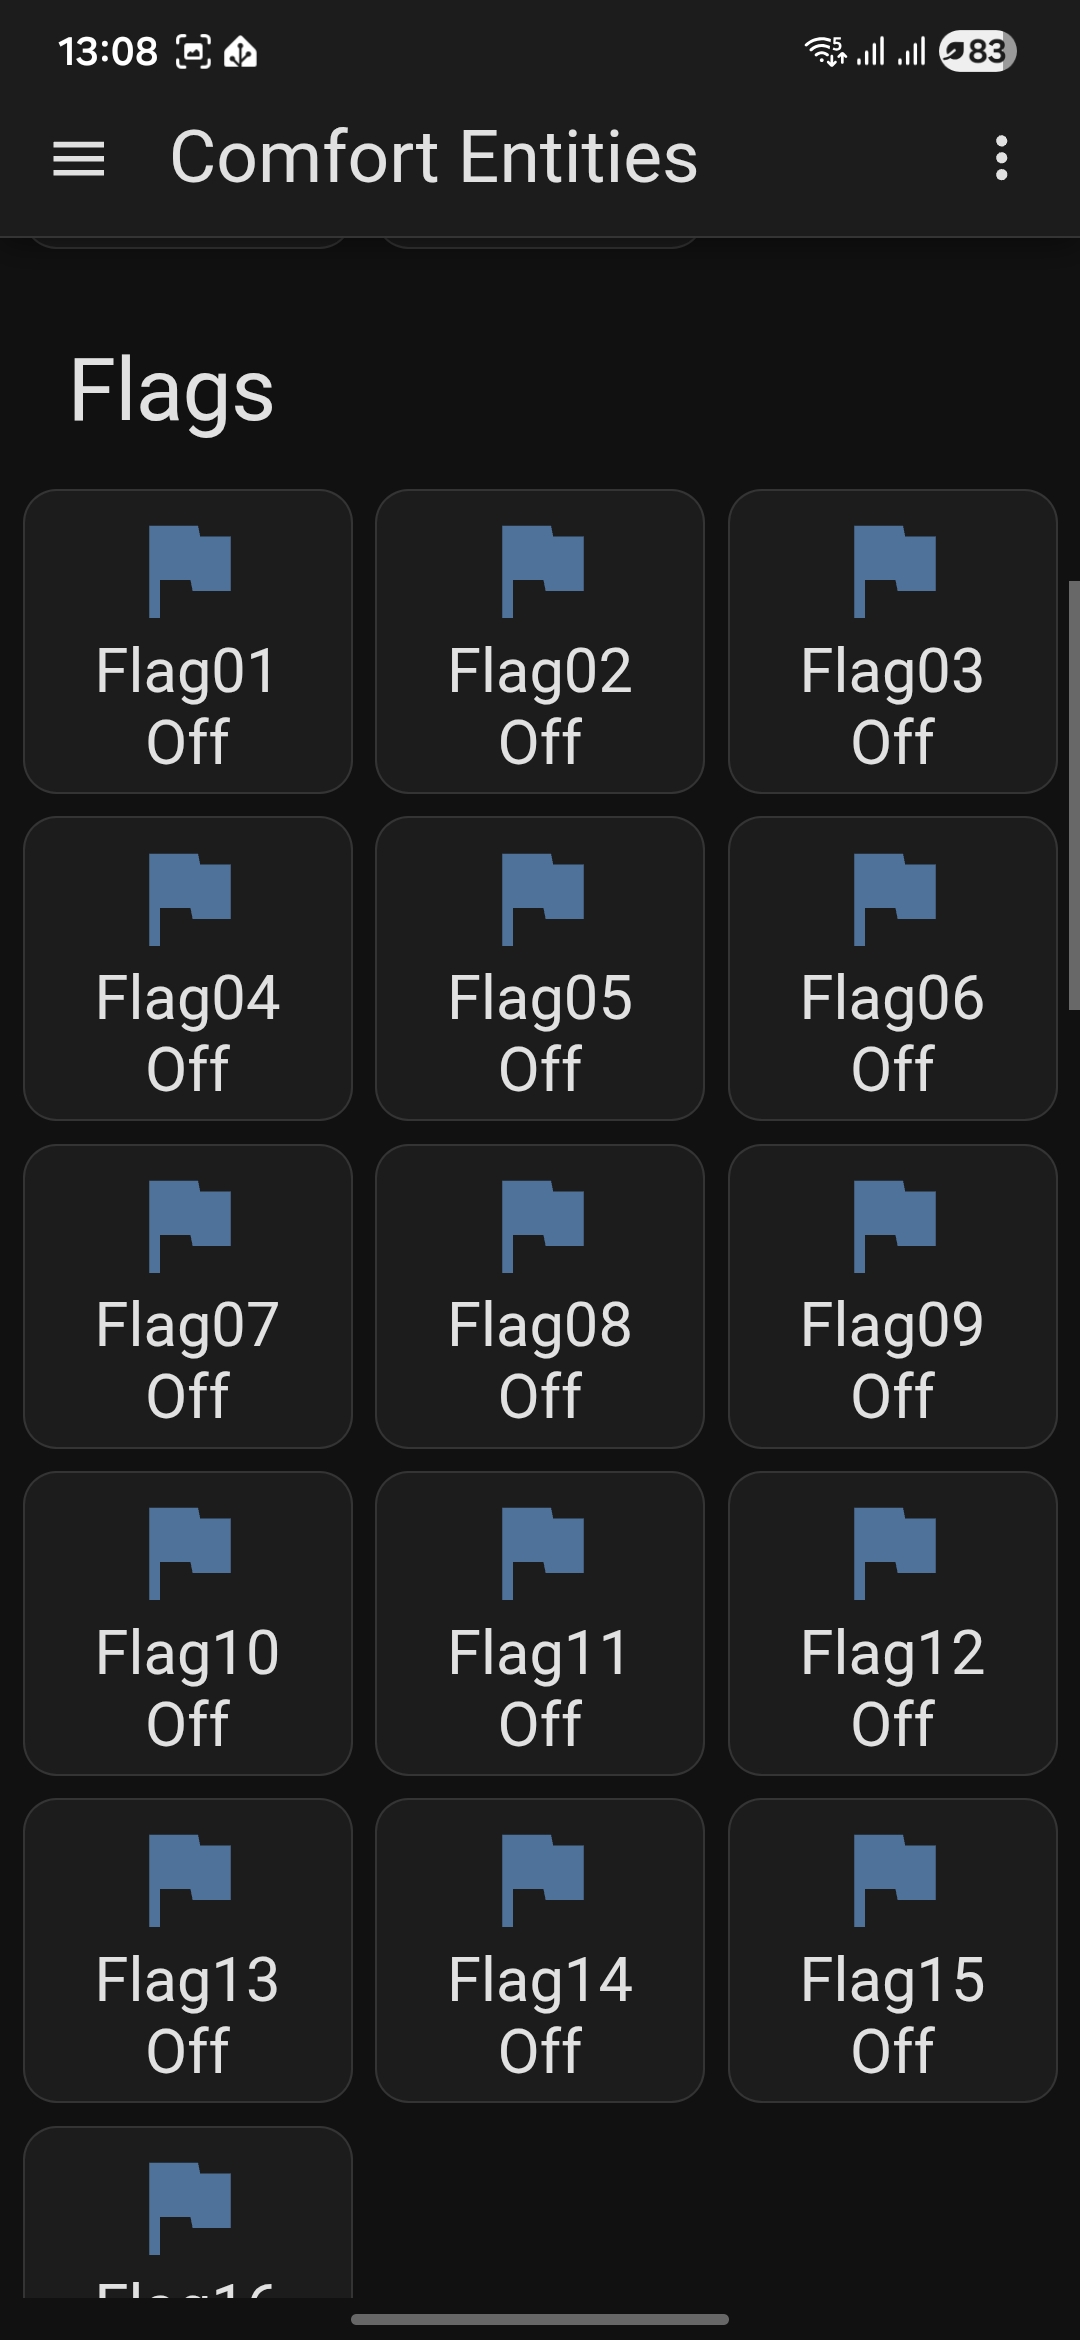
Sensors — Numerical values from the Comfort system (e.g. temperature, analogue inputs). The "Edit Sensors" panel allows writing new values to writable sensors.
9. System Info
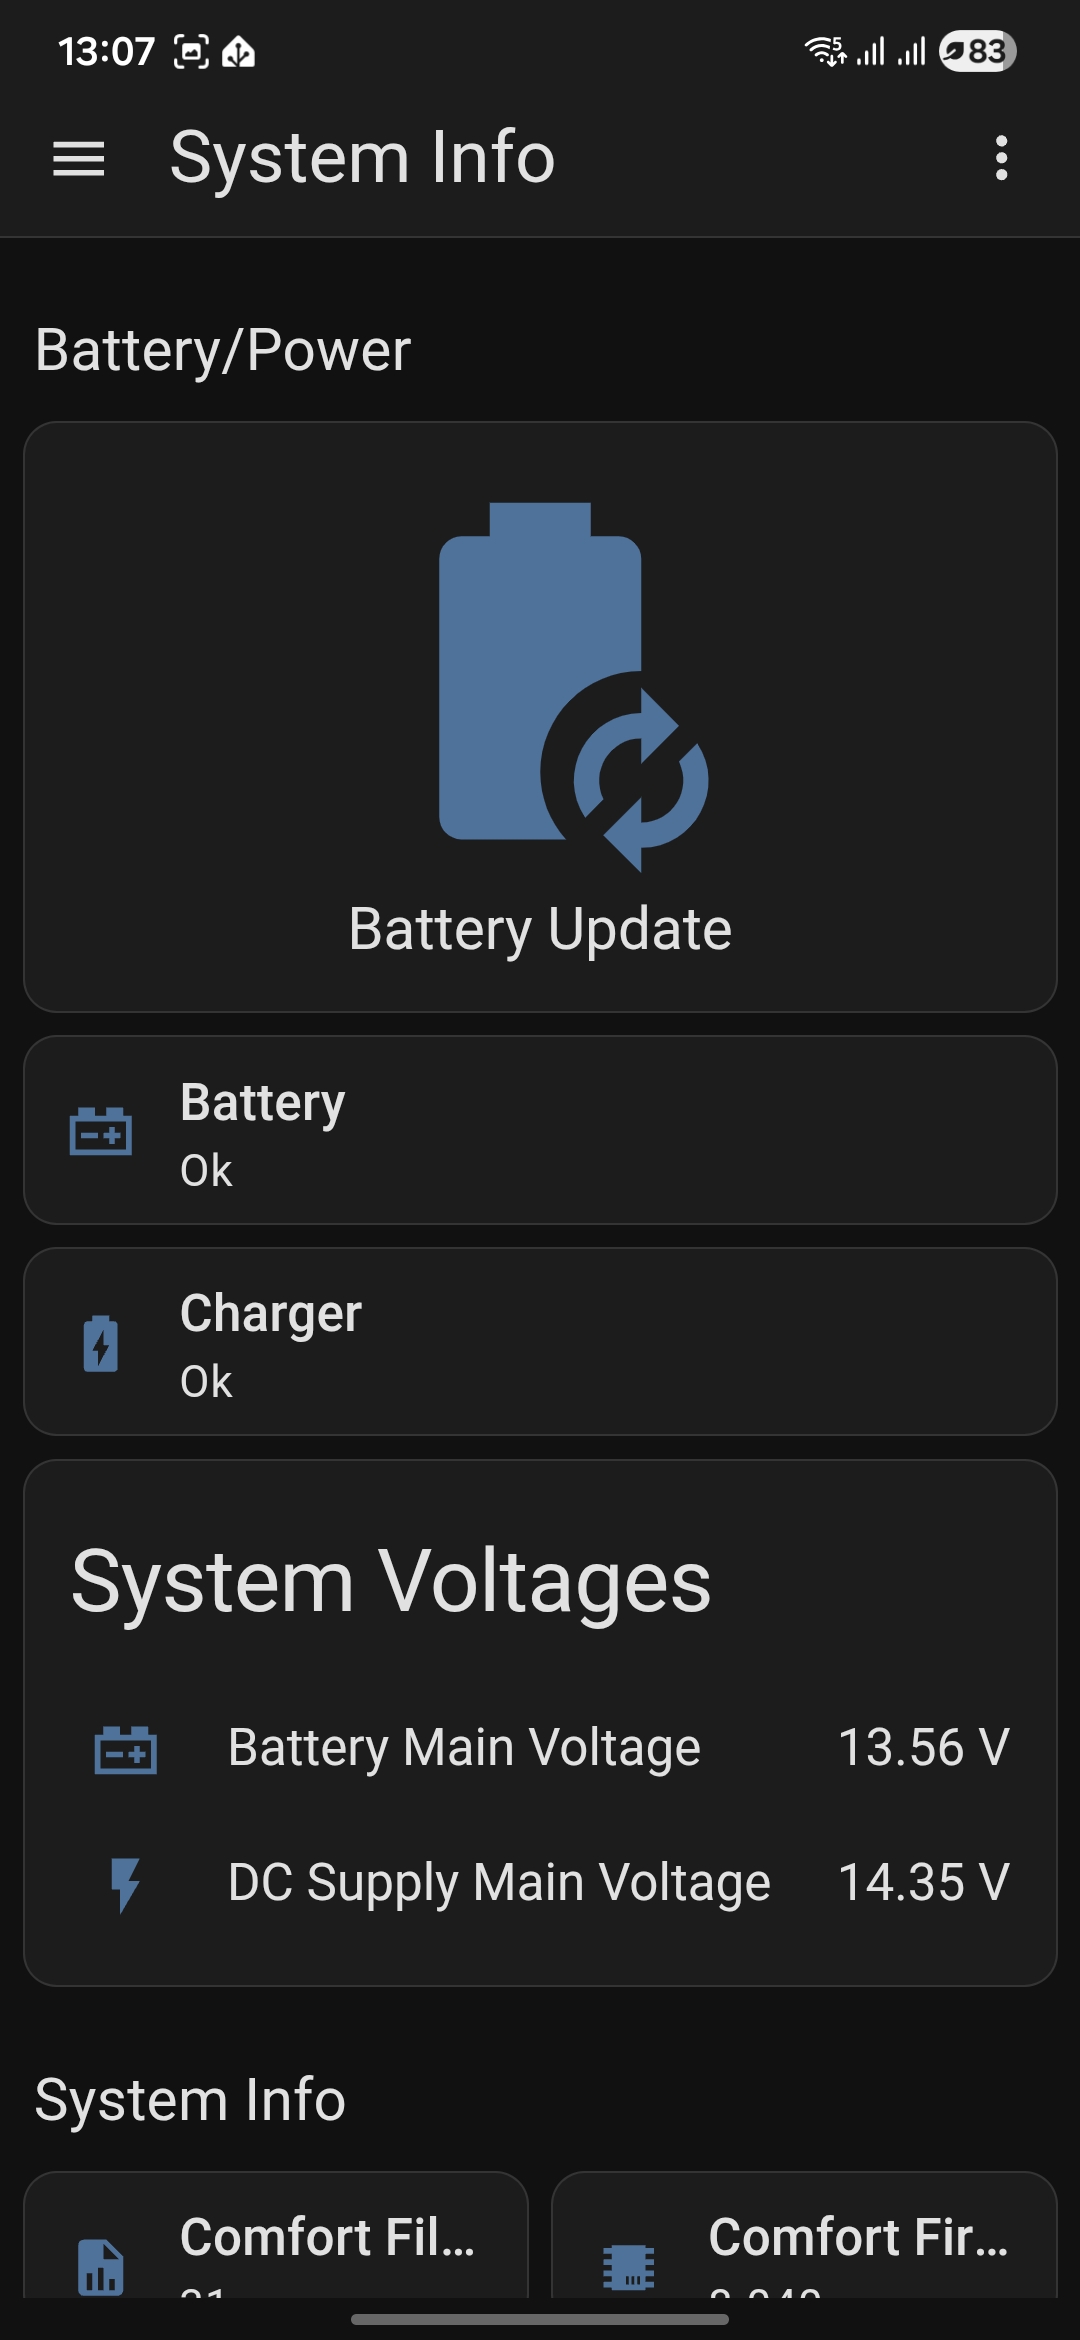
The System Info page provides a summary of the Comfort panel's health: backup battery condition, charger status, and measured voltages. Access it from "System Info" in the left sidebar.
9.1 Battery and Power
- Battery — OK indicates the backup battery is in good condition. A fault is shown if the battery is low or disconnected.
- Charger — OK indicates the panel's battery charger is functioning correctly.
- Battery Update — Button that requests a fresh battery status update from the Comfort panel.
9.2 System Voltages
- Battery Main Voltage — Current voltage of the backup battery. A healthy, charging battery reads approximately 13.5–13.8 V.
- DC Supply Main Voltage — Voltage from the panel's DC power supply, typically 13.8–14.4 V.
9.3 System Info Details
Below the voltages section, additional technical information is shown: Comfort firmware version, file count, and other system identifiers. Useful when contacting technical support.
Post 6 of 7 – Mobile App Setup & Remote Access - slychiu - 05-16-2026
Post 6 of 7 — Mobile App Setup & Remote Access
Installing the Companion app and accessing Home Assistant from anywhere
10. Mobile App Setup (Home Assistant Companion)
The Home Assistant Companion app is the official mobile application for Android and iOS. It gives you full access to your Home Assistant dashboard from your phone, and enables push notifications for Comfort alarm events.
10.1 Installing the App
Download and install "Home Assistant" from the Google Play Store (Android) or the App Store (iOS). The app is free.
10.2 Connecting to Your Home Assistant
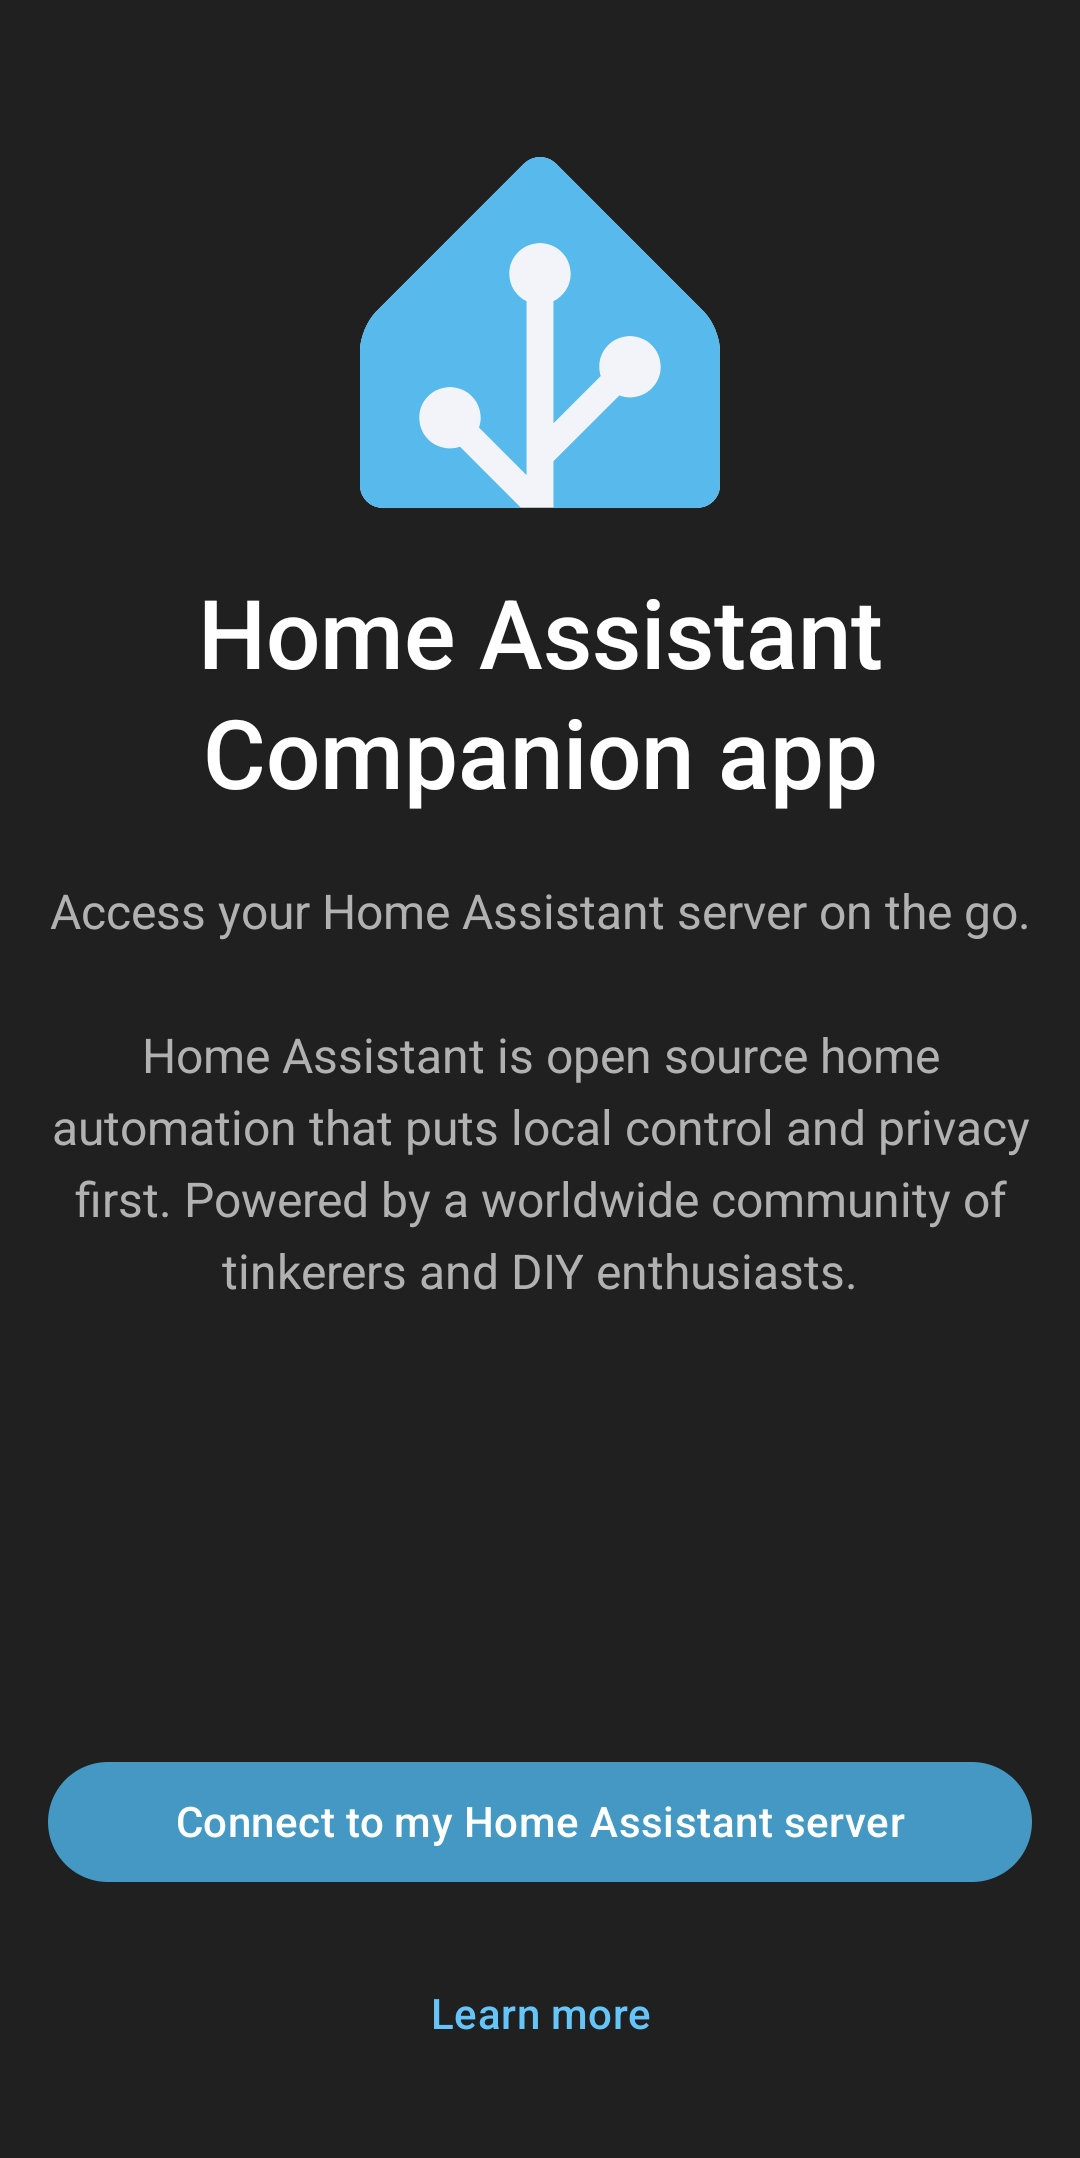
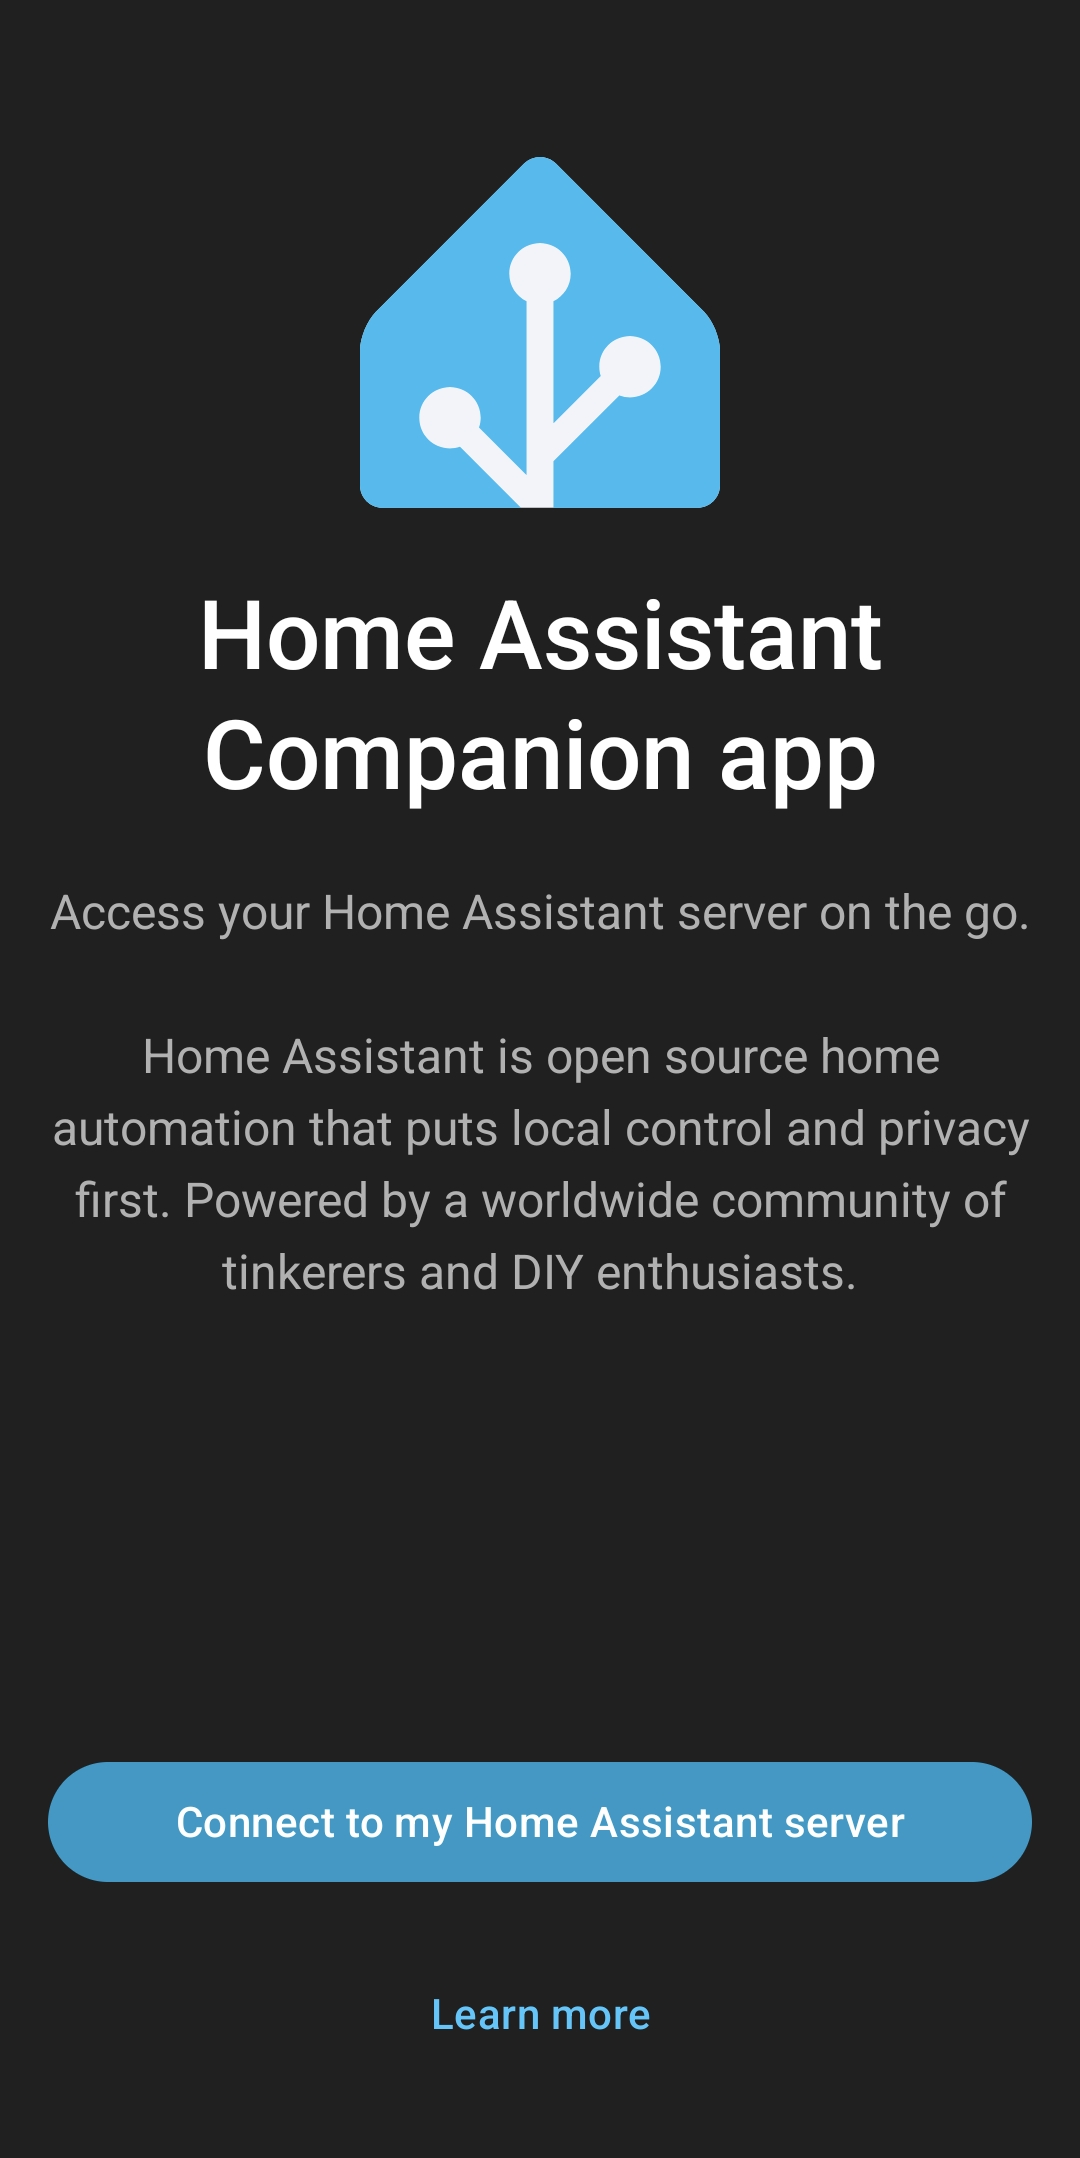
Tap "Connect to my Home Assistant server". The app searches your local Wi-Fi network for Home Assistant instances.
It is recommended that you select the ComfortLink URL (e.g. https://cytech-1.tailad4a00.ts.net) — this works at home and remotely via ComfortLink. See Section 11.1 for details.
If necessary, you can also set the Internal Connection URL as http://cytech:8123 for direct Wi-Fi connection.
10.3 Logging In
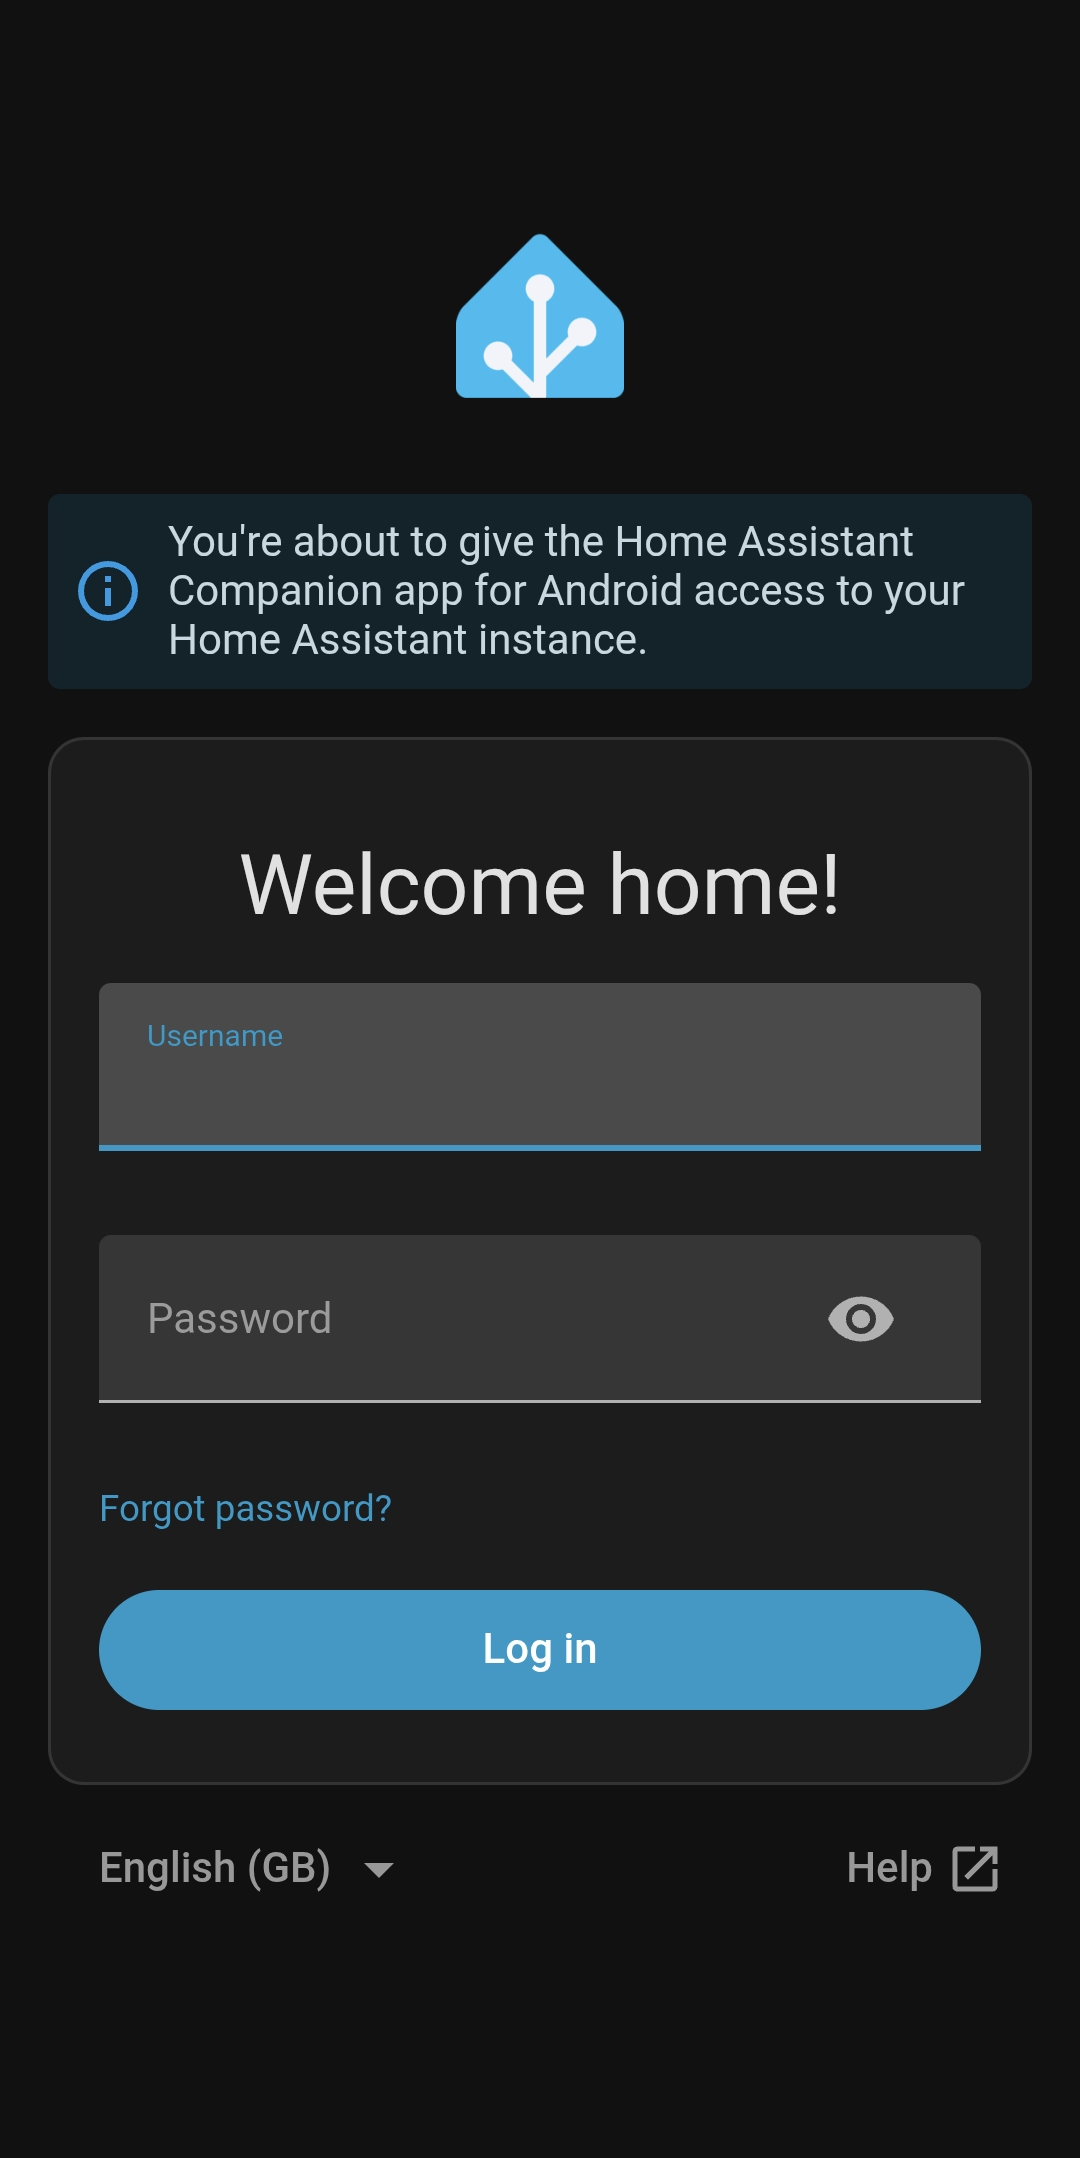
The app displays the Home Assistant login screen. Enter your username and password, then tap "Log in".
10.4 Naming the Device
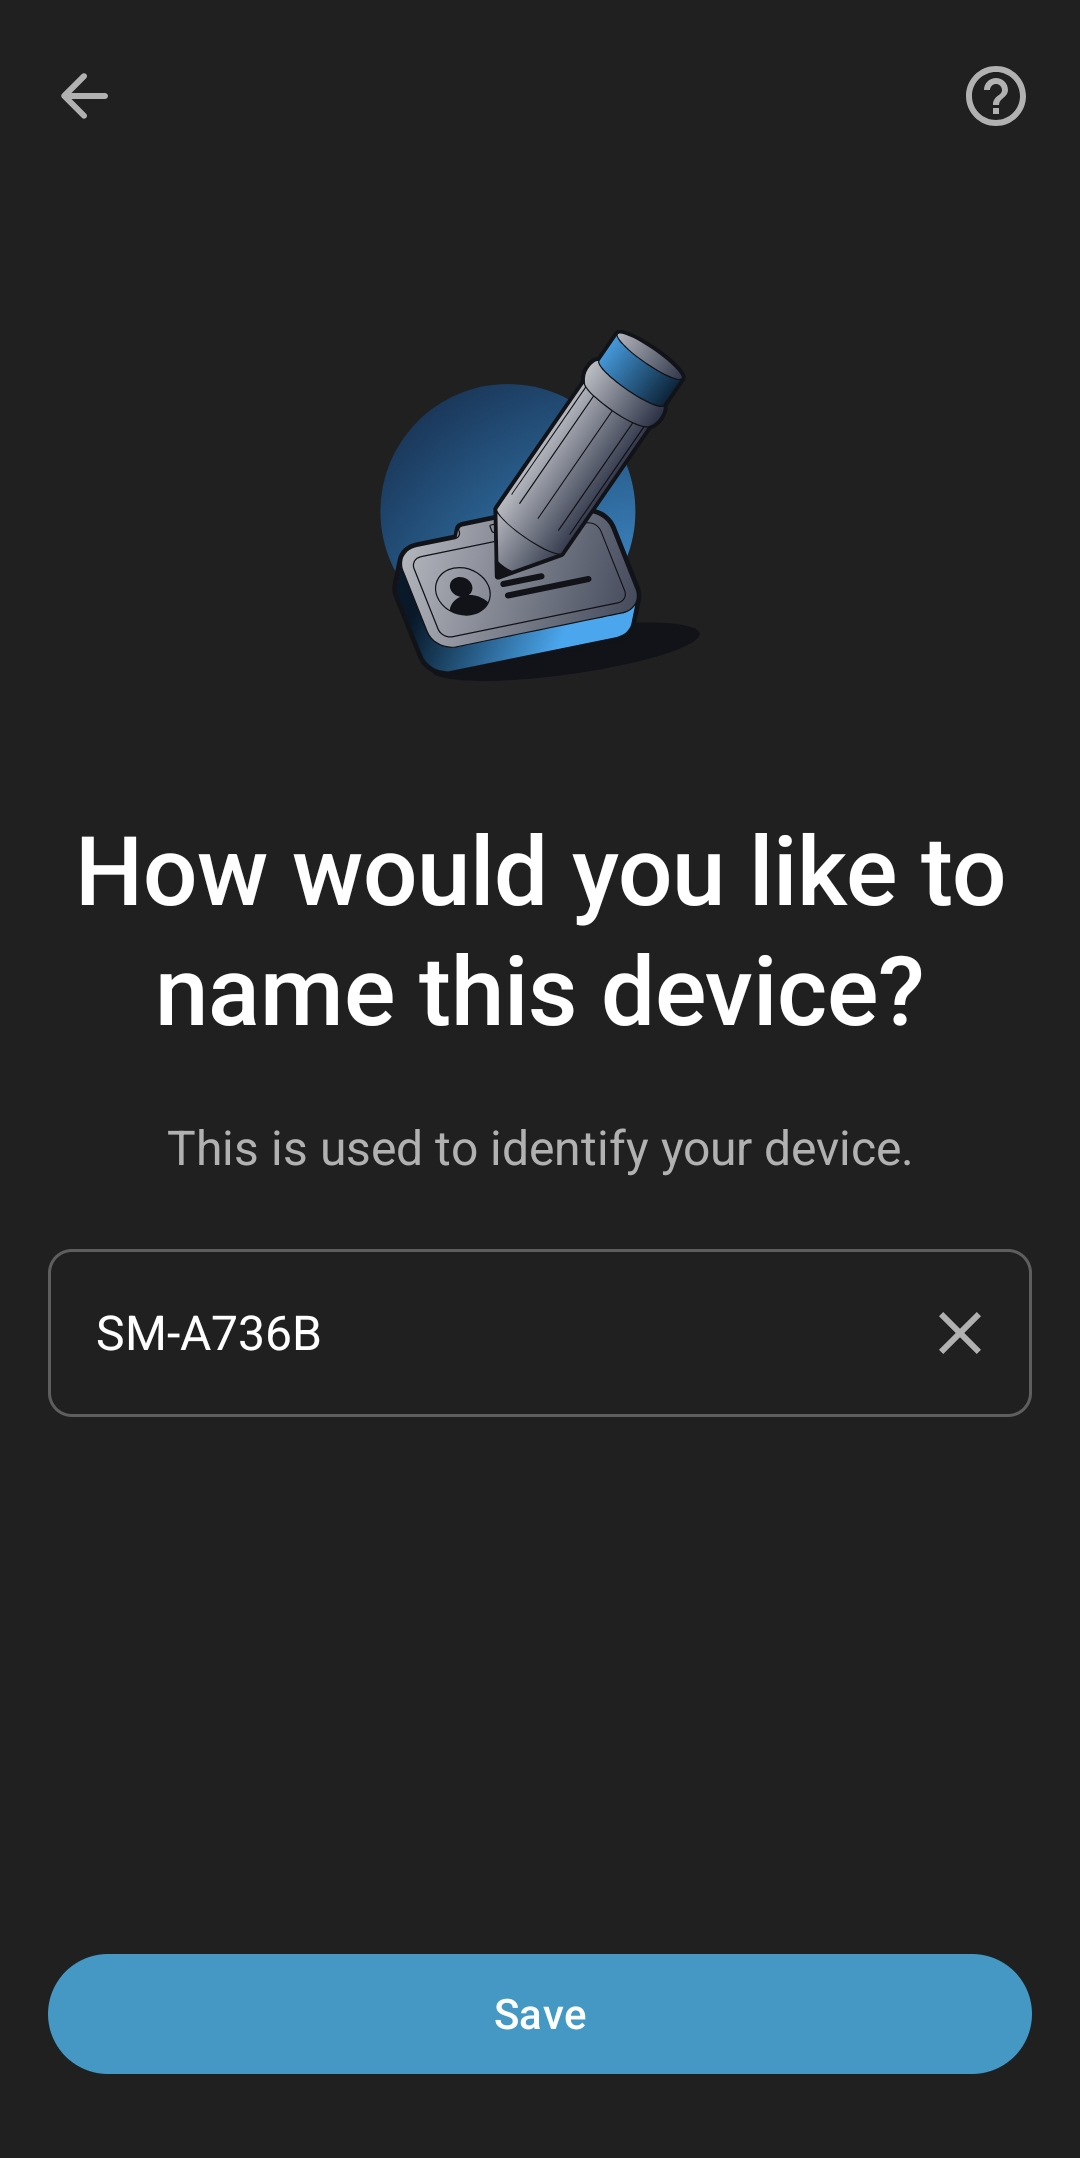
The app asks you to name this device (the phone or tablet). This name identifies the device in Home Assistant for presence detection and targeting notifications. Accept the suggested name (the phone model number) and tap "Save".
10.5 Connection Security
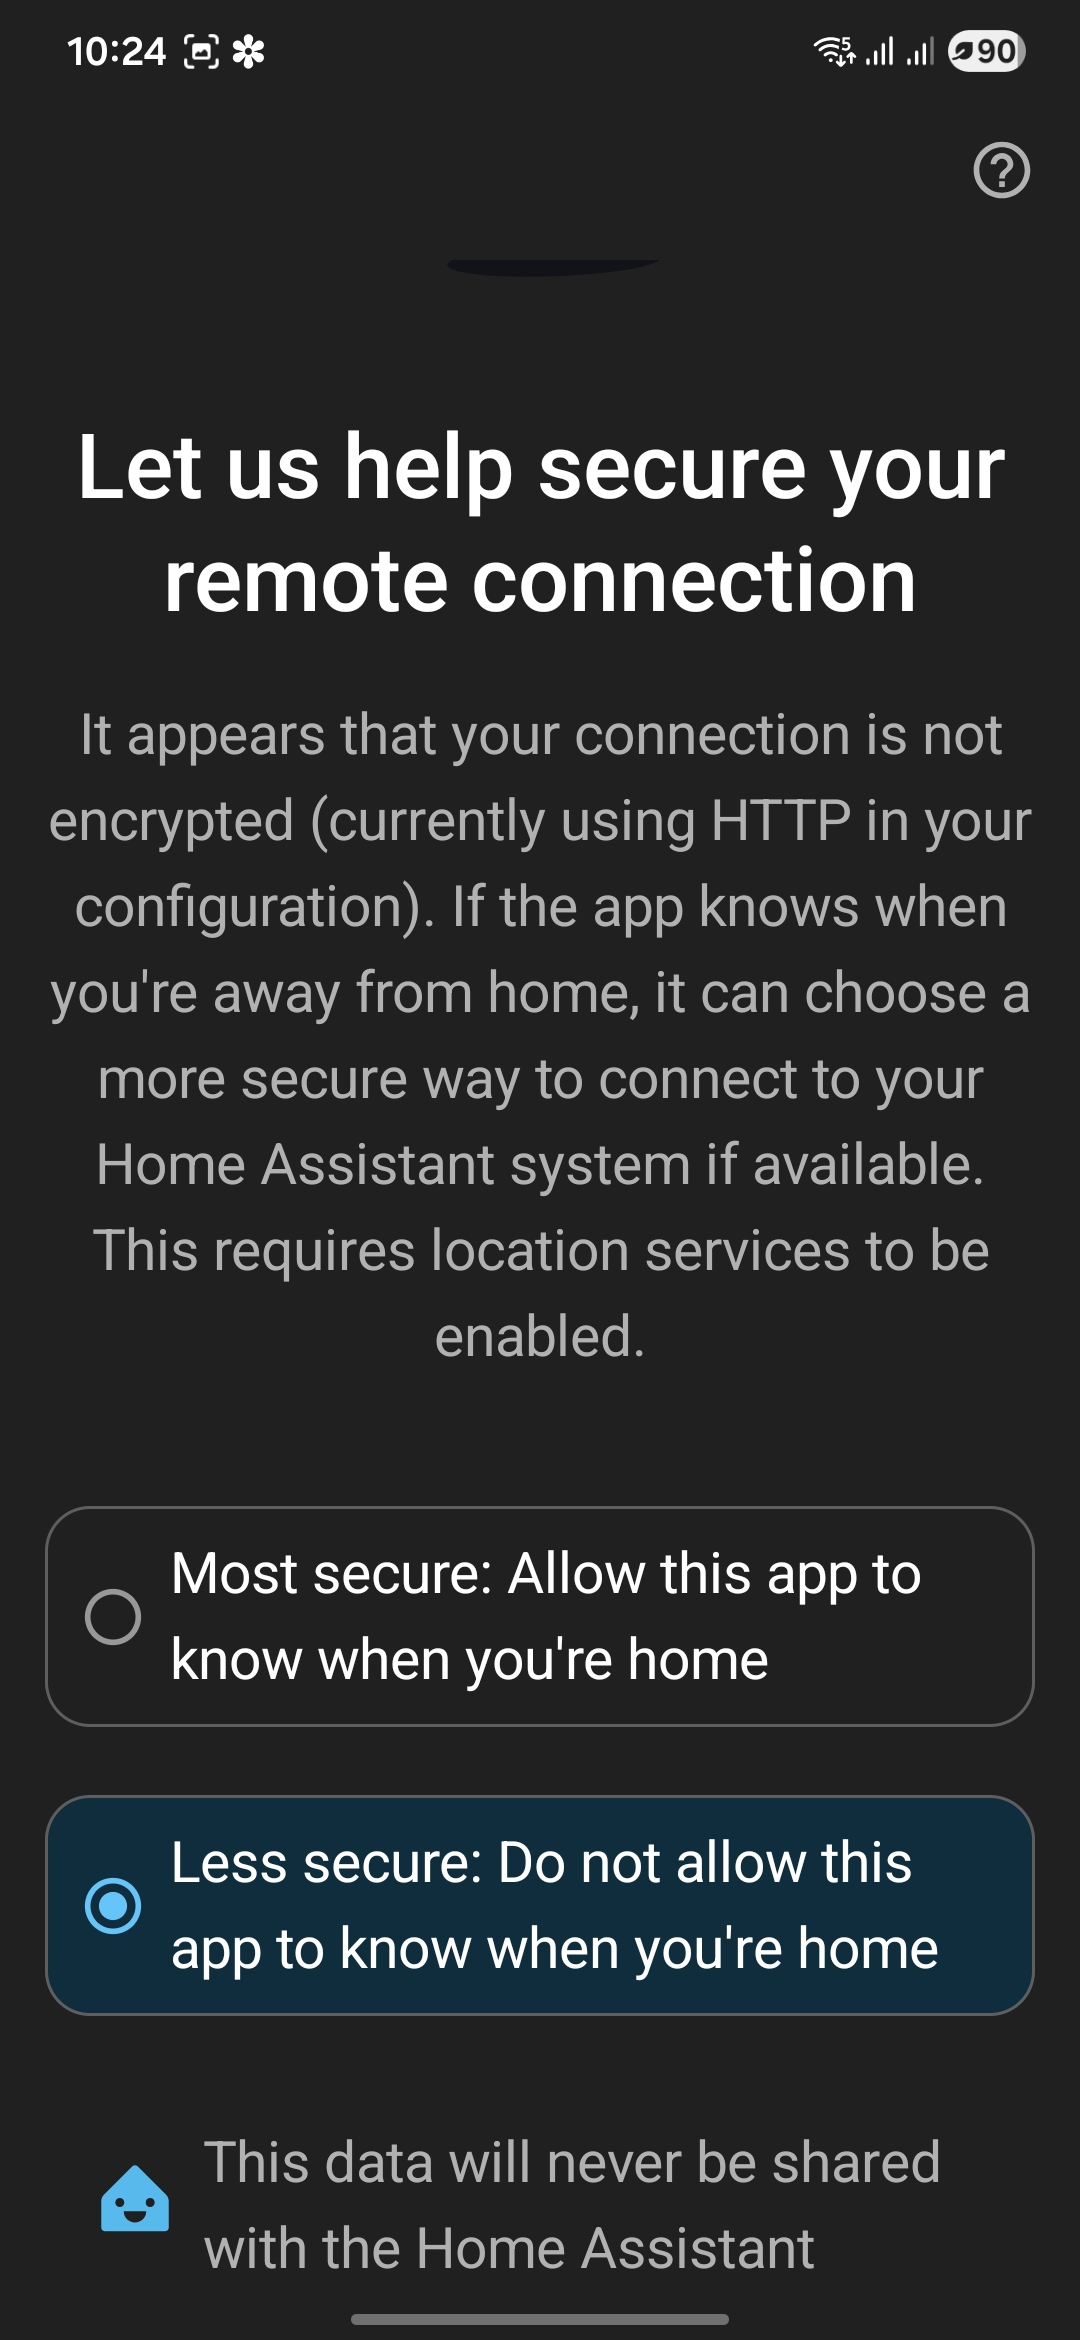
If your Home Assistant is accessed via an unencrypted HTTP address, the app presents a security option:
- Most secure — the app uses your phone's location to detect when you are home and switches between local and remote connections automatically. Recommended.
- Less secure — the app always uses the address you entered, without location detection.
Note: If you use the ComfortLink address (https://...) this screen is not shown, as the connection is already secure.
10.6 Push Notifications
Once connected, the Companion app can send push notifications for Comfort alarm events — arming, disarming, zone alerts, and bypassed zones. Notifications are generated by Home Assistant automations.

10.7 Alarm Message Log on Mobile
The Alarm Message Log is available on the mobile app Comfort Alarm page, just as on the desktop. Scroll down to view all events with timestamps.
10.8 Companion App Settings
11. Remote Access
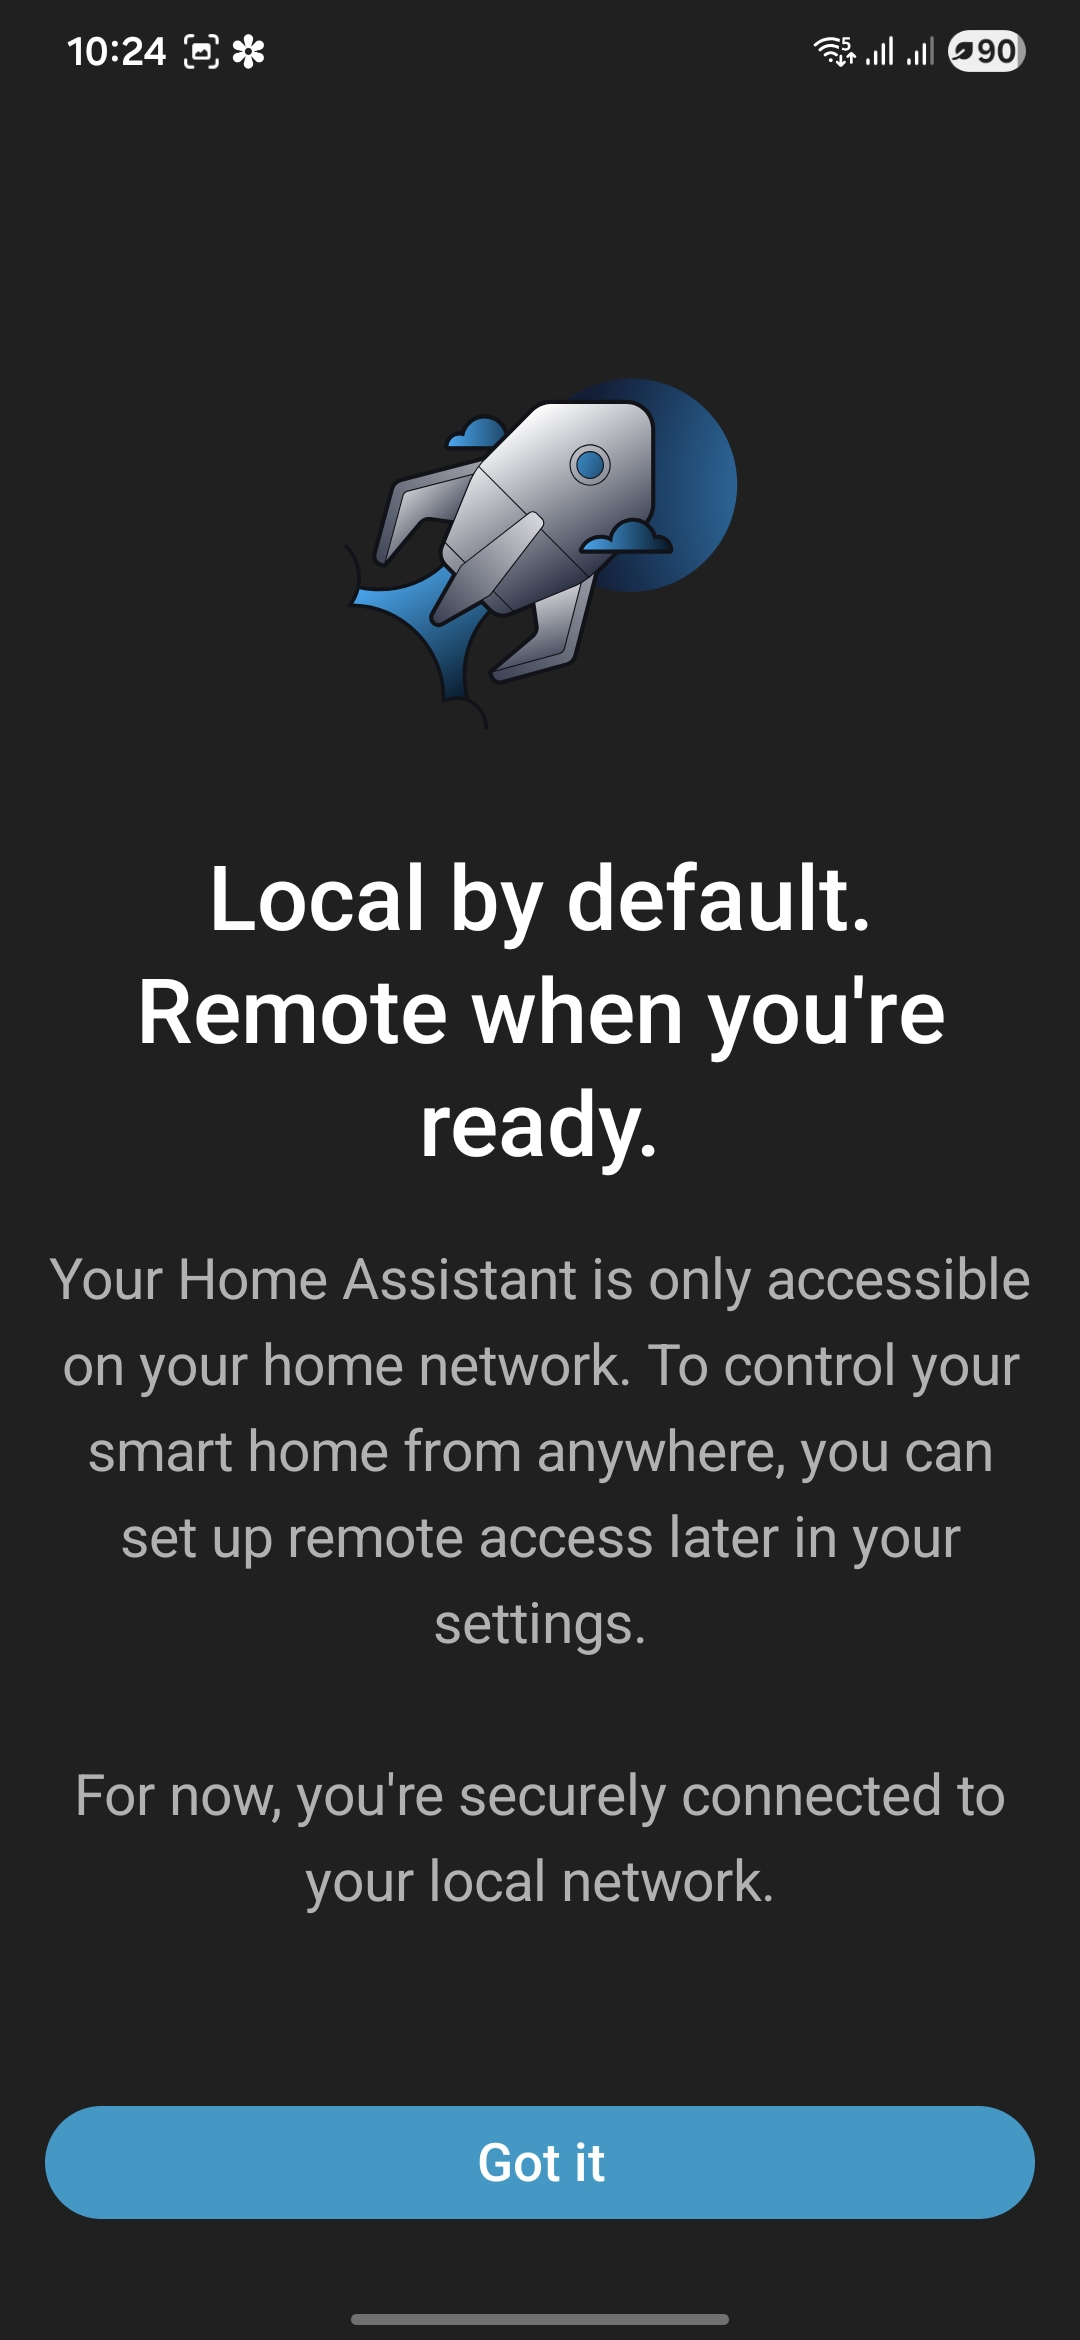
By default, Home Assistant is only accessible on your home network. Two methods of remote access are available for the UCMA/Pi.
11.1 ComfortLink (No Setup Required)
ComfortLink requires no setup. Go to the Remote Access Dashboard in the Home Assistant sidebar (below Comfort Alarm and Comfort Entities).
There is a URL link such as https://cytech-1.tailad4a00.ts.net. Click this link on your phone or desktop, or scan the QR code on your mobile to access your Comfort Home Assistant from anywhere in the world. This is a secure, encrypted link.

Security note: Anyone who knows this URL can reach the login page, so use a strong password. For a more restricted connection where only known devices can connect, use Tailscale (Section 11.2).
11.2 Setting Up Tailscale (Optional — More Secure)
Tailscale is a VPN service providing secure access to your Home Assistant from anywhere — without opening ports on your router. Only devices on your Tailscale account can access other devices in the same account. It is free for personal use (up to 100 devices).
To set up Tailscale:
- Go to Settings → Apps and click Tailscale. Note: The pre-installed version is configured for ComfortLink. You need to uninstall Tailscale and re-install it from the Install App button.
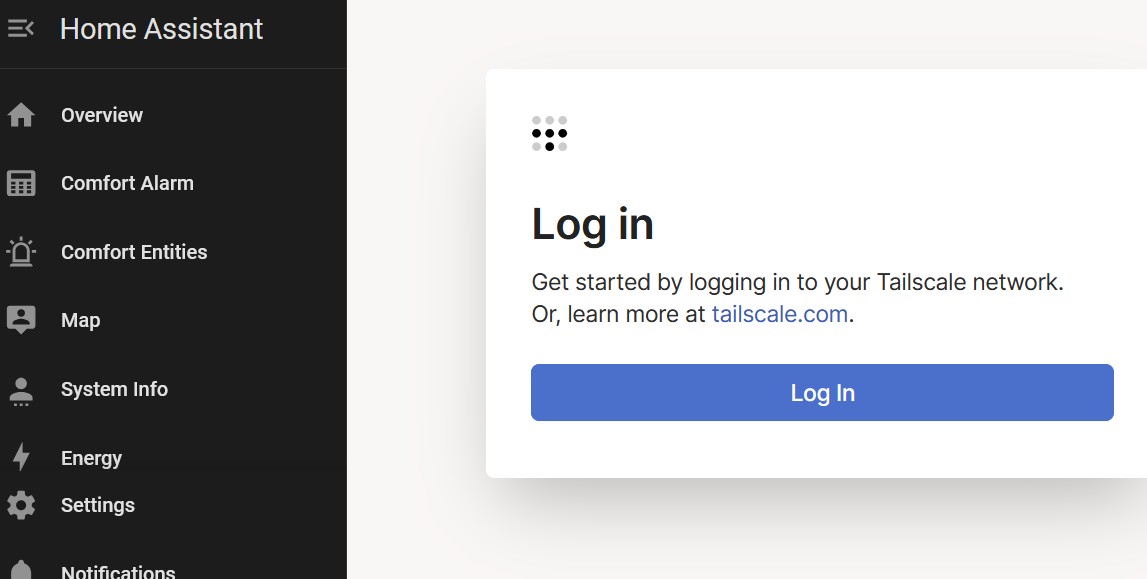
- On the Info page, click "Open Web UI". A login prompt appears.
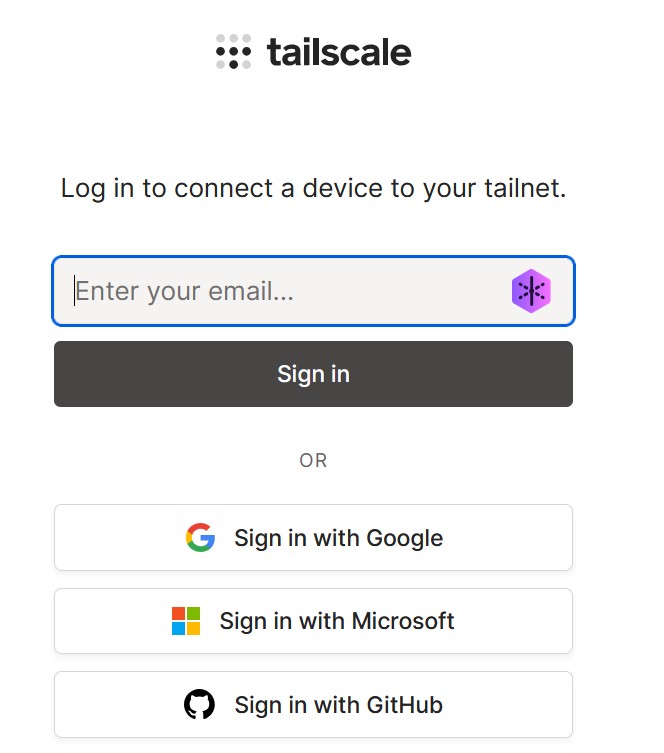
- Sign in with your Google, Microsoft, GitHub account, or email. If you don't have a Tailscale account, signing up is free and takes less than a minute.
- After signing in, Tailscale confirms the device "cytech" will be connected to your tailnet. Click "Connect" to authorise it.
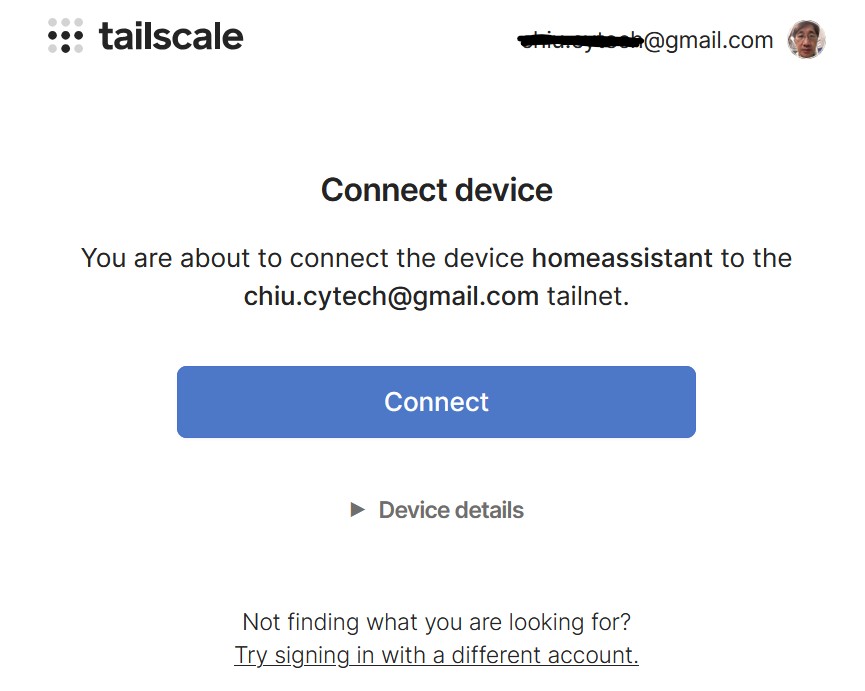
Once connected, the UCMA/Pi has a Tailscale IP address (100.x.x.x range) accessible from any device on your Tailscale network.
11.3 MagicDNS — a Fixed Name for Your Home Assistant
Instead of remembering a Tailscale IP address, MagicDNS gives every device on your Tailscale network a fixed hostname. Your UCMA/Pi becomes accessible at:
Code:
http://homeassistant:8123To enable MagicDNS, log in to the Tailscale admin console at login.tailscale.com, open DNS settings, and switch MagicDNS on.
11.4 Installing Tailscale on Your Phone or PC
Download and install the Tailscale app from tailscale.com and log in with the same account. Your UCMA/Pi will appear automatically in the list of connected devices.
In the Home Assistant Companion app, add the Tailscale URL as the remote address: http://homeassistant:8123 (with MagicDNS) or http://100.x.x.x:8123 (with Tailscale IP).
Important: Tailscale must be running on your phone at all times for remote access to work. If you cannot reach Home Assistant remotely, open the Tailscale app to reconnect. To prevent disconnection, disable battery optimisation for the Tailscale app in your phone's battery or app settings.
Post 7 of 7 – Config Files, Troubleshooting & Quick Reference - slychiu - 05-16-2026
Post 7 of 7 — Configuration Files, Troubleshooting & Quick Reference
Updating system configuration, solving common problems, and a full guide index
12. Configuration Files
The Home Assistant configuration files (yaml, json, etc.) in the Comfort add-on can be updated to apply new features or correct errors, without the user having to manually edit yaml files.
12.1 Config Files in Sidebar
In the sidebar, go to Config Files. This shows the current system version (e.g. version 1).
- Press Check for Updates to check if there are any updates in the Cytech configuration repository. Wait about 30 seconds.
- If a new configuration version is available, a notification message appears describing the changes, and an Update Now button appears.
- Click Update Now. Home Assistant will restart — this may take a few minutes. After restarting, the new changes are applied and the System Version number updates (e.g. version 2).
- You can also choose Skip This Version to defer the update.
Note: The Cytech configuration repository is at github.com/cytechtech/ucmpi4
13. Troubleshooting
13.1 Module Does Not Start / No LEDs
- Check that the micro SD card is fully inserted — it should click firmly into place.
- Check that the CM4 module is securely pressed into its connector on both sides. An improperly seated CM4 prevents the module from starting.
- Verify the UCM cable is connected and the Comfort panel is powered. Remove and reconnect the 4-way UCM cable. The red D9 and green D10 LEDs on the base UCM board should both be flashing continuously.
- For debugging, connect an HDMI monitor to the UCMA/Pi to see the boot process.
13.2 Cannot Access Home Assistant in the Browser
- Confirm the UCMA/Pi is connected to the router by Ethernet and the link LED is lit.
- Try accessing by IP address instead of cytech.local:8123. Find the IP in your router's connected-device list.
- On first boot, the system may take up to 5 minutes to initialise. Wait and try again.
- Clear the browser cache, or try a different browser or device.
13.3 Comfort System Not Connecting
- Verify the Cytech Comfort add-on is running: Settings → Add-ons → Cytech Comfort → Info should show "Running".
- Check that the MQTT Broker Address is "core-mosquitto" and the username/password match the Mosquitto broker (default: ComfortHA / ComfortHA).
- Confirm the Comfort User Login ID is a valid Comfort user code with the correct access level.
- Review the add-on log (Cytech Comfort → Log tab) for error messages.
13.4 Zone Names Show as "Zone01", "Zone02", etc.
The CCLX file has not been loaded, or the uploaded file does not contain zone name mappings. Re-export the CCLX from the Comfort PC software and repeat the steps in Post 4.
13.5 Cannot Arm — "Zone Not Ready" Message
The Comfort panel is reporting that a zone is open. Check the physical detector or contact for that zone. The zone name is shown in the Comfort Message panel and the Alarm Message Log. Once all zones are secured, arming will succeed.
13.6 Cannot Access Home Assistant Remotely
Confirm Tailscale is installed and running: Settings → Apps → Tailscale.
13.7 Push Notifications Not Arriving
- Ensure the Home Assistant Companion app is installed, logged in, and has notification permissions granted in your phone's system settings.
- Notifications are generated by Home Assistant automations. Confirm they are enabled: Settings → Automations.
- If the app has been inactive for a long time, open it once to re-establish the connection.
Appendix A: Default Settings Summary
- Zone Inputs — 8
- Zone Outputs — 0
- Comfort Flags — 8
- Comfort Counters — 8
- Comfort Timers — 8
- Comfort Sensors — 8
- Comfort Responses — 0
- Set Time and Date — Disabled
- Log Verbosity — WARNING
Appendix B: Access URLs
- Local (hostname) — http://cytech.local:8123
- Remote (ComfortLink) — https://cytechxxx.ts.net (as shown on the Remote Access page in the sidebar)
- Configuration repository — github.com/cytechtech/ucmpi4
Guide Index
- Post 1: Overview & Hardware — product overview, connectors, LEDs, UCM ID, installation steps
- Post 2: First-Time Setup — browser access, user account, home location, dashboard
- Post 3: Add-ons & Configuration — pre-installed add-ons, MQTT settings, Comfort settings, entity counts
- Post 4: Loading the CCLX File — exporting, uploading, validating, applying, Comfigurator Bridge Mode
- Post 5: Comfort Alarm, Entities & System Info — arm/disarm, zones, keypad, counters, flags, sensors, battery
- Post 6: Mobile App & Remote Access — Companion app setup, ComfortLink, Tailscale VPN
- Post 7: Config Files, Troubleshooting & Quick Reference (this post)
RE: UCMA/Pi – Complete Guide: Setting Up Cytech Comfort with Home Assistant - slychiu - 05-16-2026
This Add-on was based on the original work by koochyrat and Ingo, see https://www.comfortforums.com/thread-5577.html
The open source repository for Cytech Comfort MQTT is at https://github.com/cytechtech/ucmpi4
That Comfort to MQTT Addon is using an external Raspberry Pi (eg Home assistant Green, Raspberry Pi 4 or 5) and requires a Comfort or UCM ETH03.
This Cytech Comfort MQTT Add-on requires a special UCMA/Pi which has a CM4 from Raspberry Pi, and does not need a UCM for connection to Home Assistant.
This thread is announcement only. For questions and comments please post at https://www.comfortforums.com/thread-5858.html or start a new thread